These are arrangements around end of year show preparations (the show itself opens on Wednesday 17th June).
Clearage of spaces to allow contractors to fit out spaces will be done in two x 5 day chunks –
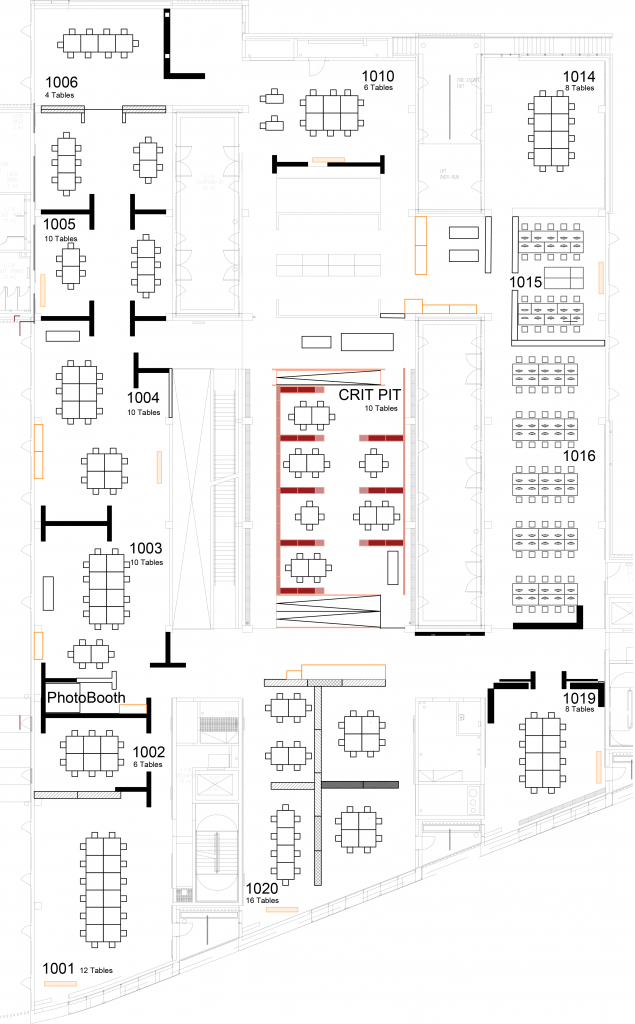
- May 11 – 15 : Graphics / Media / Animation: Studios 1001 – 1006 (marked in blue on the plan)
- June 01 – 05 : Architecture / Landscape Architecture 1010/1019/1020/1024 (marked green on the plan)
During these times we would ask that you move to other areas if you need to work – and take work away or dispose work you no longer need. An area for larger items to be disposed is marked yellow on the plan – items here will be periodically moved out by FM.
A few days before each of these weeks we will move any work still in these studios to a safe storage area (marked red on the plan). Then any items still in these spaces will be disposed / recycled week commencing June 8.
Note this includes items in the wall storage shelves and cupboards – please move anything out of these if you want to keep them.
For items you need to keep for use in the show itself we will mark out an area up on the second floor.
Items in the computer areas can stay – but these will be cleared post-show.
Overnight Access
We will keep building 11 open overnight on times before the big submissions:
- Night of Monday 11th May
- Night of Wednesday 13th May (for submission on Thursday 14th May)
- Night of Tuesday 19th May (for submissions on Wednesday 20th May)
Graduate Show
- 11th – 15 May : Graphics / Media / Animation: CONTRACTOR SETUP
- 25th – 29th May: Graphics / Media / Animation STUDENT SETUP
- Mon 1st / Tue 2nd / Wed June Graphics / Animation / Media: ASSESSMENT
- June 01 – 05 : Architecture / Landscape Architecture: CONTRACTOR SETUP
- June 08 – 16 : Architecture / Landscape Architecture: STUDENT SETUP
NO ACCESS TO STUDIOS ON 17TH UNTIL OPENING TIME
WEDNESDAY June 17th GRAD SHOW OPENING / 6PM
TUESDAY 30 June SHOW CLOSES
- Wednesday 1st July: Students start to take down / collect exhibits
- Monday 8th July: Any work remaining in 1010 & Crit Pit taken down by tech staff and stored in 1020
- Monday 13th July: Contractors commence work in studio floor
- Monday 13th July: Any work remaining in 1003/1004 taken down by tech staff and stored in 1002
- Friday 3rd August: Any work still remaining unclaimed in studios to be recycled disposed (excluding portfolios)
- Monday 21st September: Any portfolios still remaining in studios to be recycled / disposed.