 A brief introduction to running Dragonframe (3.6.5) stop motion capture software within one of our four animation suites.
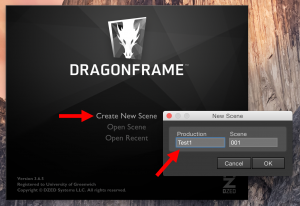
Step 1. Open up the Dragonframe software and select ‘Create New Scene’
From here you will then need to give your project an abbreviated title. Scenes will start at 001, allowing you to create many scenes that all have the same title. For ease of navigation, it makes sense to create your file on the desktop when prompted where to save your work. All of your individual captures will be stored within this folder as you make progress, as well as any test shots.
Step 2. Camera setup. Check that the camera is connected to the computer via it’s USB lead and turn it on. Ensure that the camera is set to MANUAL mode and that Auto Focus* is turned off.
*located on the lens
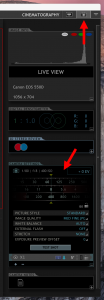
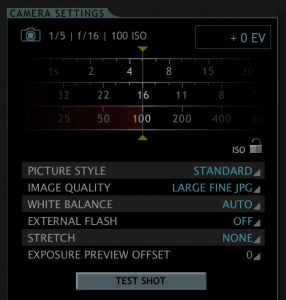 Dragonframe has two main view modes. Camera Setup, and Shoot mode. Click on the Camera icon, located top right of the application, to access the Camera Setup view. From here you have complete control over your camera settings. The settings within the image on the right are a good starting place, yet feel free to have a play get a the feel for how they affect the image.
Saying that, some settings should avoid being changed. These are:
ISO which you should keep at 100 to minimise grain and IMAGE QUALITY should be left at LARGE FINE JPG. Ideally WHITE BALANCE should be adjusted to your lighting type, AUTO should only be used as a last result if the other presets are giving you an unwelcome colour cast.
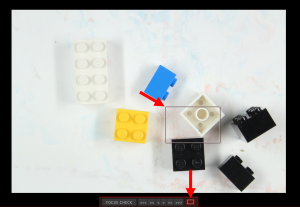
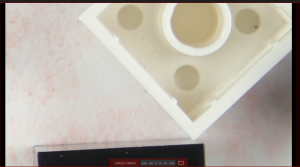
Step 3. Check your focus. If not already visible within the live view screen, click the window icon highlighted below. Once checked, a window will appear within the live view area they you can move to a location of your choice. Once an area is highlighted, click within the window for a zoomed in view of your selection. You can now use the focus ring on the front of the camera lens to focus your image with confidence.
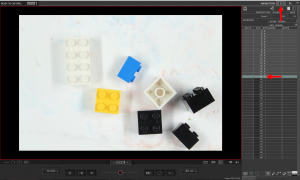 Step 4. Shoot mode. To enter shoot mode click on the Screen icon next to the Camera
 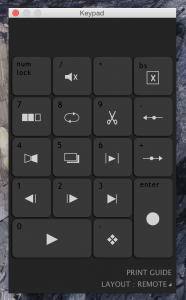 icon located top right of the application. By using either the on screen keypad (on the right) or the keypad located on your keyboard, you’ll be able to Shoot, Play, Cut, Delete, Loop and more. As you shoot, your captures will appear within the table on the right. X represents a capture C represents the current image shown on screen via live view.
To delete a capture, simply click on the appropriate frame within the table and hit BackSpace on either keyboard. It is also 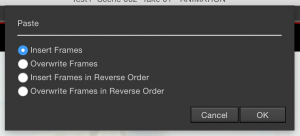 possible to copy and paste frames to save time when making repetitious scenes. Just click and drag over the frames you wish to copy within the table and either use the tool bar to navigate from EDIT down to COPY, or hit cmd+C to copy the pictures. Now click within the table where you would like the frames to go and either navigate from EDIT down to PASTE or hit cmd+V, you’ll be presented with a window displaying four Paste options.
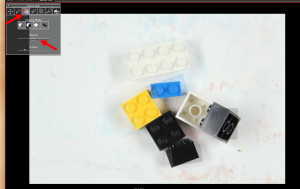
Step 5. Onion Skin. A most useful feature within Dragonframe. To turn Onion Skin on, navigate to the tool box located at the top left of the application. This tool box become invisible after a few seconds of inactivity, just move the mouse over that area to make is visible again. The Onion Skin tool is the third icon from the left. Once active, you can use the slider to make either the previous frame appear as a transparent image that overlays the live view. This allows you to more accurately adjust your movements between frames, equally it is a useful tool that can be used to reset your subject matter if they are moved accidentally or are continuing at a later date.
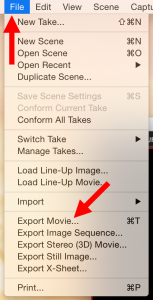 Step 6. Saving your work as a movie.
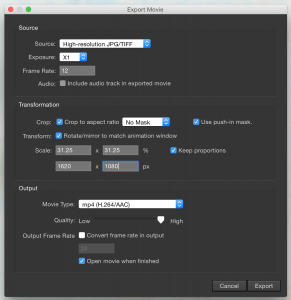 By navigating from FILE down to EXPORT MOVIE you will be presented with an export menu. The setup within the example screenshot would be a good guide for those starting out. Depending on your desired output though, there are a few options that can be controlled via this screen, some of the most important being Frame Rate, Scale and Media Type. Your Frame Rate dictates how many frames will be displayed per second. The higher the number the smoother the animation, yet the many more frames you’ll need to shoot to pull this off. Scale is used to dictate the size of your movie on screen. Bare in mind that full frame images from the camera are not the same proportion as standard wide screen, although a tick box will allow you to override the proportions if you so wish.


