No matter the size, shape or cost of your camera, they all take pictures using the same tools that photographers have been utilising for over 100 years. These are Shutter speed, Aperture and ISO (plus White Balance gets an honourable mention).

Shutter speed
Shutter speed refers to how long the shutter stays open to allow light into the camera. As well as being used to control exposure, the shutter allows for some creative imagery when used thoughtfully.
Fast shutter speeds allows you to capture scenes with minimal movement or blur, freezing a moment in time, such as capturing a falling leaf or a dancer mid-flow. Yet, when a shutter is open so briefly, very little light can get into the camera. To compensate for fast shutter speeds you need to ensure the scene is very bright plus make adjustments to your Aperture and ISO (see below). Anything above 1/125 – one hundred and twenty fifth of a second – is considered fast. 1/125 is required for handheld photography so that the camera does not pick up your own movements. But if you wish to “freeze frame” a moment you’ll need much higher shutter speeds, such as 1/500 or 1/1000.
Slow shutter speeds allow lots of light into your camera and will easily capture movement, it is not ideal for handheld photography or for photographing moving objects or people – unless you want to capture the movement on purpose. A slow shutter speed can be useful for scenes with very little light, anything below 1/125 is considered slow. The camera is more likely to record your body’s movements as well as your subjects. The slower the shutter the more still the camera needs to be. If you do not have a tripod you can try leaning the camera against a tree, lamp post, door frame, wall, chair etc to add some stability.
Bulb? Most cameras also have a bulb shutter speed setting. In Bulb mode the shutter stays open indefinitely until you hit the shutter button again. This setting allows for some really long exposures, night shoots, dark sets or for painting with light (well worth looking up).
Aperture
Aperture refers to the diameter of the opening between the lens and the sensor and works in much the same way as your iris. Controlling the size of the aperture has two affects.
First, it allows you to control how much light gets into the lens to hit the sensor. For example, in low light conditions you may wish to open the aperture wide to let more light in, possibly reducing the need of a slower (longer) shutter speed. Or you could make the aperture as small as possible to let in less light for very bright scenes.
Second, the aperture adjusts the depth of field within an image. Depth of field: The area in focus in front of and behind your main point of focus. By adjusting the aperture you can affect how much of your picture is in focus. More expensive cameras/lenses tend to have the biggest range of apertures.
Lens type also affects depth of field, long lenses and macro lenses have naturally shallow depths of field, whilst wide lenses have a large depth of field. Additionally, proximity also has an impact, the closer your subject/object is the the lens, the shallower the depth of field becomes.
When you take aperture, lens type and proximity into account you will have full control over how much over your pictures are in focus.
ISO
ISO refers to how sensitive your camera is to light, meaning you can make an image brighter by adjusting the ISO, making it possible to shoot in low light conditions. Yet there is a consequence to consider.
ISO ranges usually start at 100 and can go up to 6400 and beyond. With a low ISO (say 100), you will need more light to capture an image. With a high ISO (say 800) you will need less light to capture an image. The price for this very useful ability is image quality. The higher the ISO the more “noisy” your image becomes. Digital grain will become visible and blacks will be washed out. Pushing the ISO up a small amount should not affect your images very noticeably yet you will need to explore what your camera limits are as each model is unique. Grain and noise are not always a bad thing; sometimes it is necessary as without a high ISO it would not be possible to take the shot, and when used as a creative choice, grain can be quite effective.
White Balance
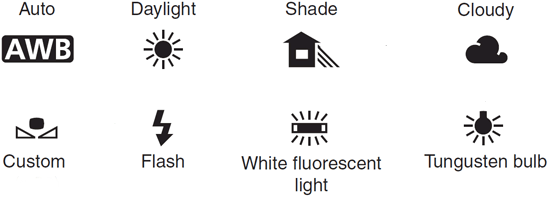
White balance is often overlooked. As standard your camera will be set to Auto White Balance, or AWB. Much like our eyes, modern cameras are very good at gauging the light within a scene and adjusting the white balance accordingly.
What is white balance? Every type of light has its own colour temperature. Sunlight is generally seen as blue light yet is warmer at sunset, sunrise and when cloudy. Lamps/bulbs are generally warm yellow lights and fluorescent lights tend to be green. Your camera in AWB mode will work this out for you and make make things look “normal”. Yet AWB is not always correct; if you want to take a picture of a sunset for example, the camera could see the warmer light and think the sunset is actually lamp light, resulting in an image that is much cooler with less colour intensity. To get around this, all cameras have a number of fixed white balance modes. If you have time, I would always recommend picking the white balance mode that is most appropriate for you location/image.