General tips for shooting at home
• Backgrounds
For most setups you will want to keep things simple. If you can use a sheet of paper attached to the wall and a tabletop great! If not then plain walls and table tops work well, as can plain sheets or bedding. Get creative and ensure whatever you decide to use compliments your model. It may be that a more rustic background works best. Whichever you use, make sure the background is considered.
• Lighting
Photography is impossible without light, so consider your source carefully. Natural light can work really well. Windows are your room’s softboxes – setup with a window to one side and a reflector* on the opposite side of your model and you’ll have some lovely soft light.
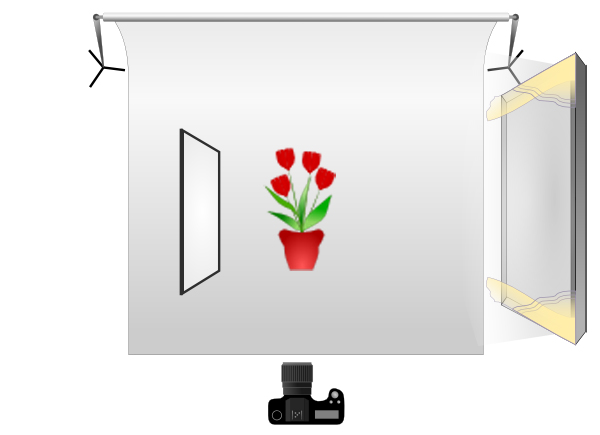
* Reflectors can be anything white/light. A white sheet, a white towel, some white card or some foam-board for example
For harder light (i.e. with shadows) you’ll need either direct sunlight or lamplight, just be aware that house lamps are not often very bright which could lead to your images being noisier/grainer than preferred.
NOTE: Please be aware that some household lamps get very hot, do not cover them as there is a risk of fire.
As a general rule (but by no means absolute) the less light sources you have the more natural a shot will look. Try to use reflectors rather than adding more lights to lighten parts of your models.
For more on lights, see Home Lighting options
• White balance
With lighting in mind, each light source has its own colour temperature that cameras are very sensitive to, this is known as white balance. As a general rule:
Daylight is Blue • Lamps are Yellow/Orange • Fluorescent tubes are Green
So be wary: mixing light sources can be problematic and create odd colour casts within your images. It is possible to buy daylight balanced bulbs and torches, this will make mixing light easier, or simply revert the images to a black and white state for a alternative method.
• Cameras
The camera you choose to use can make all the difference. A Digital SRL is arguably much better then any camera phone, yet they do take more effort to get the most out of them and will probably require the use of a tripod. If you do not own a DSLR, it is still currently possible to book one from the equipment store found in the basement or Stockwell Street:
- Visit the equipment booking website at https://gre.siso.co
- The first time you use the site you will need to press the ‘Forgotten your password?‘ link, enter your username@gre.ac.uk email address to receive a login password.
- If you have ant issues speak to a member of the storeroom team
The biggest drawback to a DSRL is that they are physically quite big, so if you want shots from inside a small model, a camera phone may be your best/easiest option.
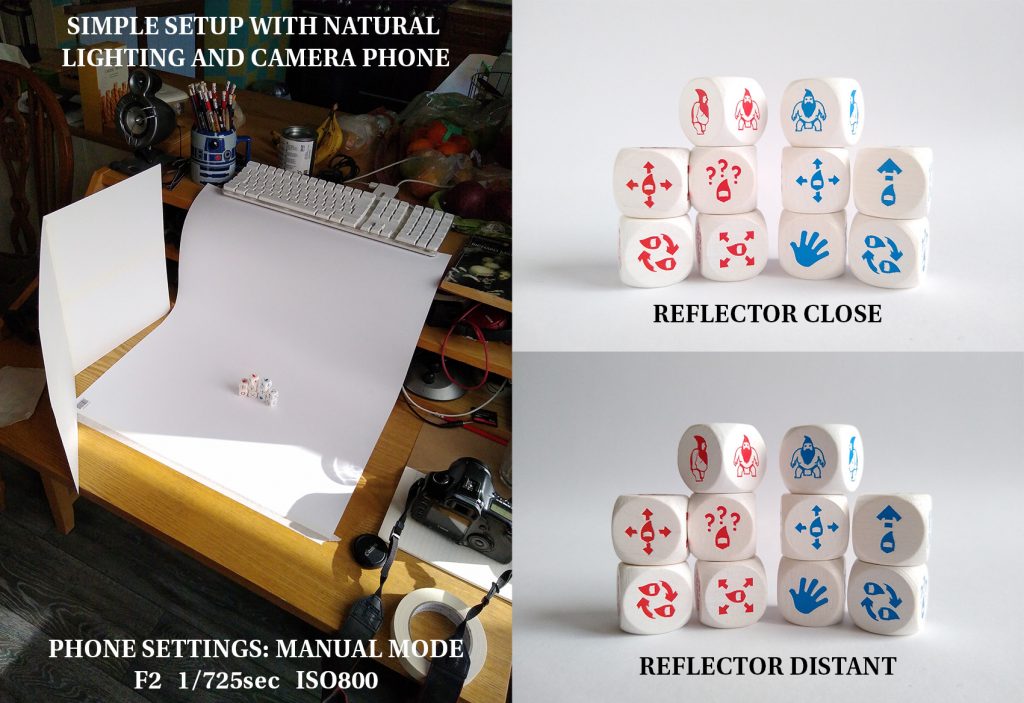
Whether using a DSRL or your phone, all cameras follow the same working principles. You may need to download an app to get access to all the functions (I’m looking at you iPhone) but by taking your phone into manual mode you’ll be able to control the white balance, shutter speed, aperture and ISO, all tools that give you complete control over how your phone takes pictures and well worth experimenting with.
Example:
Here is a setup I made at home on my desk. For the reflector I taped together four sheets of white card that came with some comics I bought. The background is a sheet of craft paper from The Works, its white on one side and red on the reverse…
• Tripods
Tripods are almost essential for still life photography, many of which come with phone attachments making them pretty versatile. The reason they are so useful is that it allows you to shoot a slower shutter speeds.
Lamp lights and window light tend not to be very bright which would normally mean operating the camera a slow shutter speeds to compensate, this would make it impossible if hand held. So to be able to hand hold the camera it will automatically (depending on setting) open the aperture and increase the ISO, which keeps the shutter speed high. YET, what this also does is makes your images grainy and makes the depth of field VERY shallow.
Using a tripod means you can keep your ISO low and you aperture where you want it as 1sec exposures are now no longer a problem.
If you do not have access to a tripod, try to find creative ways to support the camera without needing to hold it.
• Flat copy / Scanning
If you need to make a copy of your work that would have required you to use the scanner at University, hopefully this will help.
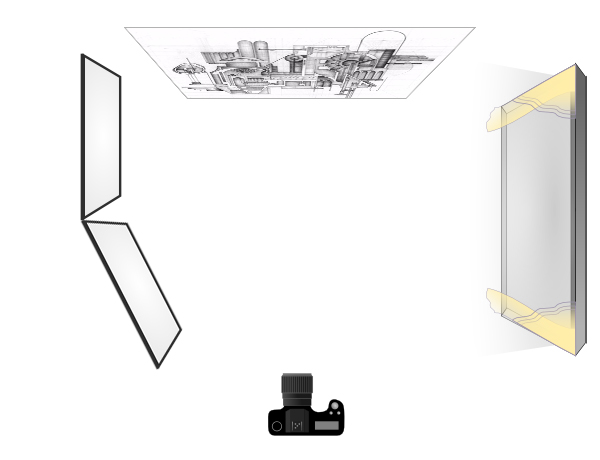
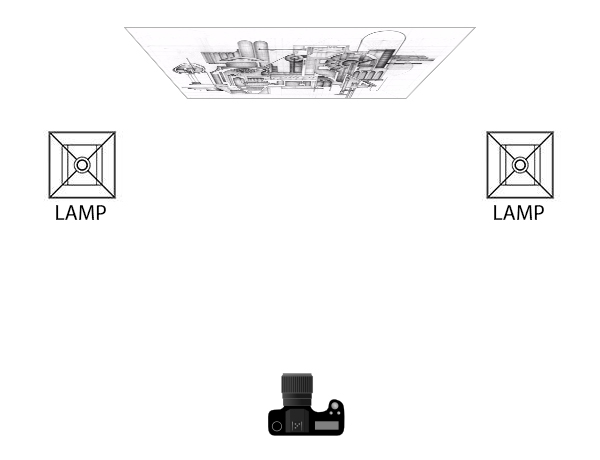
The key factors are that you will need soft/even lighting, that you use a standard or long lens and that the camera is perpendicular to your work.
• Lighting: Make sure your light is even. Either by using two very similar lights, on either side of your work. Or, if only using one light source, make sure you bounce the light back in on the opposite side with a reflector.
• Lens: Anything wider than a standard lens will distort your work by warping the edges. Make sure you use a lens no wider than 35mm. 50mm or above would be ideal. For Camera phones it is more tricky; trust your eyes.
• Perpendicular: if you are not looking directly at your work the perspective will be off. Make sure the camera is directly above your work and as close to being central as possible.
• Setup: The simplest setup is to lay your work on the floor and hold the camera above and centrally. If you work is large (A1 above) it may not be possible to be far enough away from your work without using a wide angle lens (35mm or below). In this scenario it may be better to mount/tape your work to a wall, this will allow you to keep your camera perpendicular whilst allowing you to stand further back and lessening the chances of distortion.