Rendering, like printing, is one of those tasks that always takes far longer than you expect. While it is important to have good quality, sharp final images simply dragging all the sliders up to maximum quality is likely to have little visible difference but will significantly increase the time taken – and also the likelihood of the machine crashing altogether.
Think about what you are rendering – turn off layers / objects that you won’t see; there’s no point having complex hinges included in a distant perspective for example. Similarly, thousands of trees with dense branches,etc are going to kill a render as each twig needs shadow calculations etc. Consider adding people / foliage / rain / etc in Photoshop
For render sizes; the following is a list of image resolutions that will fill A3/A2/A1 sizes:
150 DPI (Sensible)
A3 – 2480 x 1753
A2 – 3507 x 2480
A1 – 4966 x 3507
200 DPI (Ambitious)
A3 – 3307 x 2338
A2 – 4677 x 3307
A1 – 6622 x 4677
300 DPI (At your own risk)
A3 – 4960 x 3507
A2 – 7015 x 4960
A1 – 9933 x 7015
Quick Render Speedup / Memory troubleshoot tips
- Reduce resolution of final image
- Lower the quality of the final render; there are some presets that can be loaded from the top of the Vray Options window:
General – Preview / Very Low / Low / Medium etc
(Start low and work up if the image quality is not adequate) - Override materials (see below): Global Switches
Troubleshooting Rendering / Memory Crashes
Often you can solve problems with render times and crashing jobs by being less pushy with your final images sizes. Try at least rendering a lower resolution, and if you must then work your way higher.
Vray Settings : Rhino / Vray
The following are recommendations from Chaos; the developers of Vray, for reducing excessive memory usage in Vray for Rhino and Sketchup
- Geometry – scenes with lots of objects and/or triangle counts require more memory to render. There are several ways to reduce this amount:
- Adjust the raycaster params in the System rollout (reduce Max. levels , increase Min. leaf size , increase Face/level coefficient , or adjust the Dynamic memory limit.
- Image buffer – large output resolutions require a significant amount of RAM to store the final image. There are several ways to reduce this amount:
-
- Use the Render to V-Ray raw image file option and then use the V-Ray raw image file viewer to convert the resulting file to a different format (see below)
- Render the image in several different sections and stitch the pieces in Photoshop
- Image samplers (AA) – the image sampling algorithms of V-Ray require some amount of RAM to hold all the data for the sampled image. This amount can be quite large, depending on the chosen bucket size and sampling rate. To reduce that amount:
- Reduce the bucket size.
- Switch to a different image sampler – for example, the Adaptive DMC sampler uses less RAM than the Adaptive subdivision sampler.
- Global illumination caches – irradiance maps, photon maps and light maps all require additional memory to store them. Each of these has different methods for controlling its memory usage: Rhino scene – Rhino itself stores a lot of information about the scene. V-Ray has no control over that memory, but you can adjust the quality of render meshes to reduce it.
- For the irradiance map – the memory depends on the number of samples in the map; you can reduce this number by using lower Min/Max rate , and more loose threshold values (higher Colour threshold , higher Normal threshold , lower Distance threshold ).
- For the photon map – the memory depends on the number of photons stored. You can reduce this number by reducing the Diffuse subdivs for the lights, or by increasing the Max. density .
- For the light map – increase the Sample size .
Lose the Materials
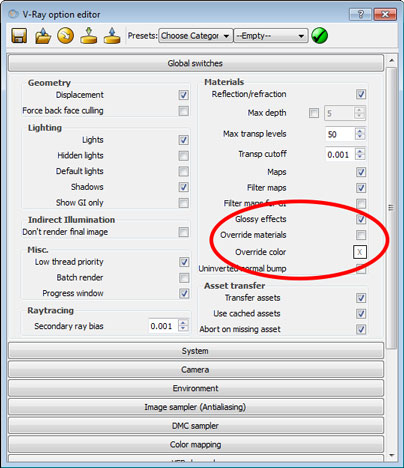
Lots of materials can add to the complexity and RAM requirements – even if you haven’t explicitly used any materials you might find some imported models might have had them attached. You can override any materials with a plain colour quite easily in the VRay options window.
- In the Vray options dialogue box, expand the GLOBAL SWITCHES section

- Tick Override materials
- Click Override colour and select a colour to use for everything (white or light grey is good)
- this will eliminate any material related errors / overheads that the file may have had.
- NOTE: if there is a material that you still really need then you can make an exception for it by going to the Material Editor and for that material Options turn off “Can be Overridden”
[divider]
Don’t render to Image Buffer – render straight to a VRimg file
This is a big RAM saver; it means you are rendering directly to a file on your hard drive rather than into RAM. The advantage of this method is that the rendered chunks will be streamed to a file (in vrimg file format) and will then released from memory once saved so preventing out of memory errors common to large resolution renders. If you have to render large resolution images then this technique is very useful.
To make use of this option IN VRAY FOR RHINO AND SKETCHUP
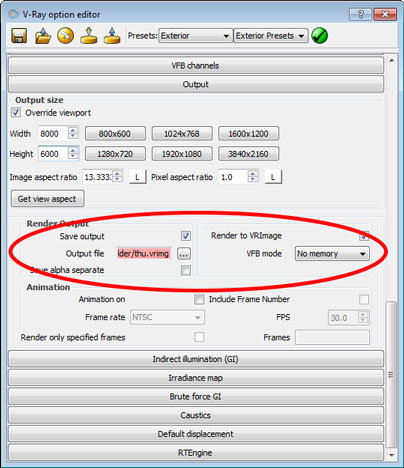
- In the Vray options dialogue box, expand the OUTPUT section

- Below Render Output
- Tick Save Output
- Save your file – AS VRay-Raw Image File (VRIMG extension)
- Tick Render to VRImage
- Set VFB Mode as No Memory
- Render your model – you’ll see a big red cross in the render window rather than the real image (i.e it isn’t using any memory trying to display the model)
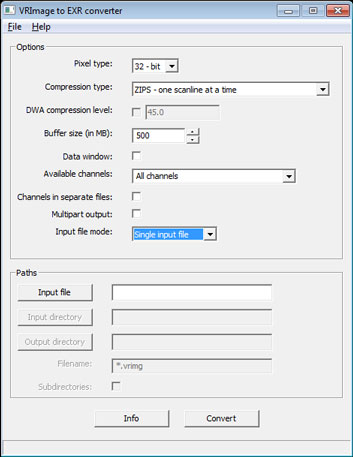
- When the render is finished then it needs to be converted from Vrimg format to OpenEXR format : There is a tool for doing this in
- Start > All Programs > ChaosGroup > V-Ray Advanced for 3ds Max > Tools > VRImg to OpenEXR Converter.

- Select your VRimg file via the INPUT FILE button > Convert > select a destination for the EXR file
- Start > All Programs > ChaosGroup > V-Ray Advanced for 3ds Max > Tools > VRImg to OpenEXR Converter.
- Open this EXR file in Photoshop
- It is quite likely that the file appears lighter than expected – this is due to differences in gamma settings of Vray. This can be easily altered in Photoshop:
- Image > Adjustments > Exposure and set Gamma corrections to 0.4545
[divider]To make use of this technique IN 3D STUDIO
- Disable all Frame Buffers (Max and V-Ray)
- browse to the V-Ray:: Frame Buffer rollout in the Render Scene dialog
- enable Render to V-Ray raw image format and select a folder and filename where to save the output to.
- When render is done converted the file from vrimg format to OpenEXR format : There is a tool for doing this in
- Start > All Programs > ChaosGroup > V-Ray Advanced for 3ds Max > Tools > VRImg to OpenEXR Converter.
- Open this EXR file in Photoshop


