


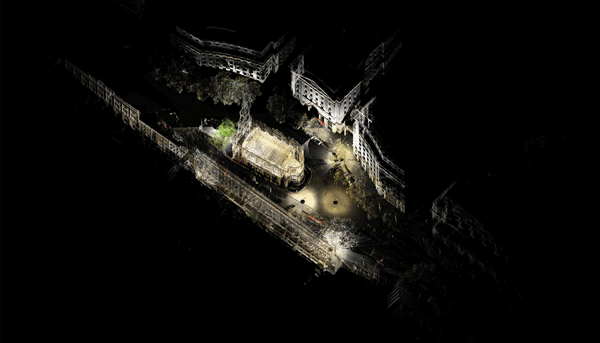
The Faro X130 HDR Laser scanner is a 3d laser scanner capable of capturing objects and buildings, architectural façades, complex structures etc.
The laser scanner can scan up to 130m in any one direction, therefore it can scan a sphere with a diameter of 260m in total, both interior and exterior spaces. The scanner uses GPS to locate itself globally if you are scanning externally.
Use of the scanner by students would require induction on its operation. Off-site visits would require prior approval and / or supervision with member of staff.
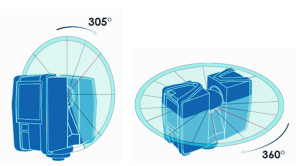
The laser scans vertically (305 degrees, everything except underneath itself) by spinning a mirror and firing lasers out, whilst the casing rotates 360 degrees horizontally. This way the device can scan (almost) everything that surrounds it.
Scanner Considerations
The scanner uses a SD card to store the scan data. Use a high quality SD card, and make sure that your PC can read the card before using it in the scanner; ideally you should format it via the scanner control panel.
The scanner will not register glass or transparent surfaces. It will also not scan behind solid things – potentially leaving blind spots. Move the scanner and do multiple scans around the space as a way of eliminating blind spots and building a more complete 3d model of a space.
It is a good idea to have a rough site map hard copy to mark down where scans were done and their order. This will be very useful when registering the scans later.
DO NOT USE THE SCANNER IN RAINY OR MISTY CONDITIONS – The scanner does not handle moisture; this may damage it.
Be aware you may need permission to operate the scanner in certain areas – and may be challenged if you just setup in the street. Consult with the council or the owner of the building if necessary.
Operation and Use
After carefully positioning the scanner on its tripod and tightening the nut, make sure you get the scanner as level as possible by using the tripod’s inbuilt spirit level. This does not need to be absolutely perfect as the scanner can self-adjust automatically to an extent, but it needs to be fairly level to begin with.
The scanner is operated with a screen located on its casing. You will see this screen once the power is switched on (takes a while to start up fully). Before you begin a scan session, you should check your settings on both the ‘Parameters’ and Manage’ options at the bottom of the screen.
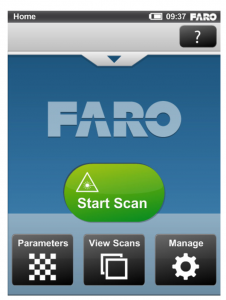
Press ‘Parameters’ to bring up this screen:
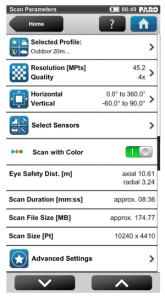
Select Profile: choose the most suitable preset from the list
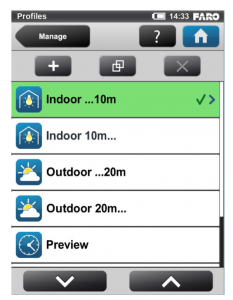
There is an option to create multiple projects and folders but if you are just doing a single scan trip on a newly formatted SD card then you don’t need to worry about this.
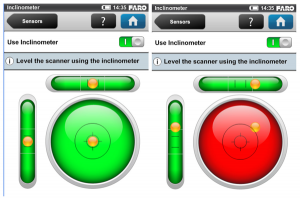
Before starting the scan you should check the scanner is level: select the ’Inclinometer’ from the Tools option. If the circle is red (shown right), then adjust the tripod manually until the orange ball is in the larger black circle. From there, the scanner can auto-adjust its level.
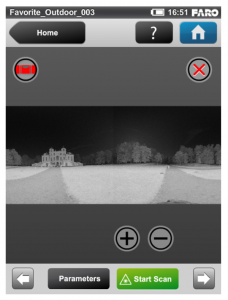
You are now ready to scan. Go back to ‘Home’. Press the green ‘Start Scan’ button to scan.

Try to avoid being in the scan path if you can – but do not leave the scanner out of sight.
ALWAYS AVOID LOOKING AT THE LASER WHILST THE SCANNER IS IN OPERATION.
Once the scan is complete, you will see a lo-res preview on the screen. To do another scan, move the tripod and press the ‘Start Scan’ at the bottom of the screen.
Move the scanner to the next location and repeat.
Once you have done all the scans then power down and dismantle the scanner. You will now need to post-process the scan data from the card using specialist scan registering software.
Processing scan data
There are a number of applications that can bring in the data from the SD cards for registration and processing:
- Faro Scene
This is the manufacturer’s own software. It is not straightforward to use but it does have a point cloud to mesh converter
Faro Scene Guide - Autodesk Recap Pro
This is the easiest but most basic software to use for scan registrations
Autodesk Recap Pro Guide - Cyclone Register 360
Very powerful registration software
Cyclone Register 360 Guide