


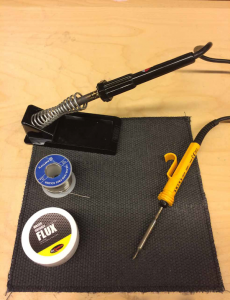
- Soldering Kit
- Workshop Category: W2
- Workshop Risk Category: Green Label
To solder we use a soldering iron to supply heat to melt solder so that it can flow into the joint between two pieces of metal and join them together.
Start with a Risk Assessment to ensure a safe work area:
- Discuss with workshop manger the job to be undertaken and collect equipment from workshop office.
- Access space to if it is suitable for the task and to make sure it is clear of combustible materials and
tripping hazards - Clear space if necessary
- Move Purex extractor over the working area.
- Explain to other people in the vicinity what you are planning to do
- Place all equipment to be used out on workbench. These will include but not limited to
• Soldering iron
• Soldering iron holder + damp sponge
• Lead and rosin free solder
• Flux
• PPE equipment
• Wire wool
• Helping hands or/and heatproof soldering block
• Hot warning sign - Check PPE equipment for faults and to test if it fits properly and meets stands set out in the risk
assessment. - Check Electrical equipment for PAT test sticker and any faults. Giving special attention to cable for
damage.
Operational Safety Rules:
- Turn on soldering iron
- Clean joint area with wirer wool
- Secure metal to be joined in either helping hand or on to heatproof mat
- Apply flux to joint area
- When the iron is hot, apply some solder to the flattened working end at the end of the bit, and wipe it
on the damp sponge so that the solder forms a thin film on the bit. This called tinning the bit. - Melt more solder on to the tip of the soldering iron, and put the tip so it contacts both parts of the
joint. - The solder will flow around all the parts that are at, or over, the melting part temperature of the
solder. - Turn off soldering iron and place hot warning sign next to it.
- Tidy space and remove all rubbish
- Once soldering iron is cold return to workshop manager
- Inform workshop manager you have completed the work