Waypoints: OBJ to VR Headset Translator

“Waypoints” is our Virtual Reality (VR) conversion tool to enable users to view their 3d models in real time with a VR headset.

The software will translate files from standard 3D packages such as 3D studio, Blender, Rhino etc into a format that can be viewed on a VR Headset – or rather a mobile phone in a suitable headset holder like Google Cardboard.  The converted file is loaded into the browser window of a mobile phone and fitted inside the headset where it will respond to head movement to allow the user to look around their design.  Additionally “waypoints” are generated around the model to let users navigate around the VR space;  simply “stare” at one of these points to select it, then that point is moved towards.
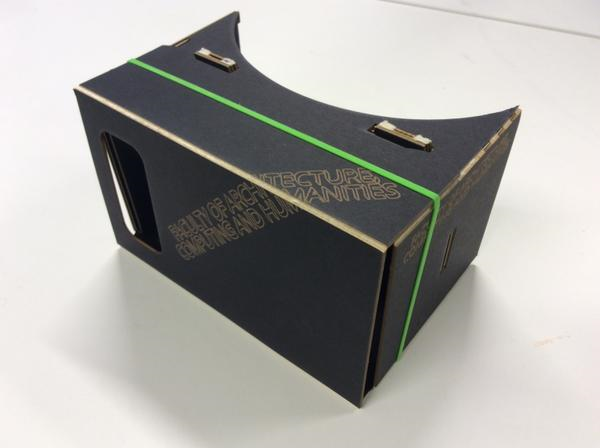
‘Waypoints has been developed for the department by Joe Green, using three.js and NW.js.’

vr-headset

Instructions

Waypoints Beta r1 Documentation

This is beta software and may contain bugs.

You will need:

  • A copy of Waypoints.
  • A Windows PC and a mobile device connected to the same wifi network.
  • A mobile browser with WebGL support (most modern smartphones and tablets will have this)
  • A VR viewer for your mobile device, such as Google Cardboard.
  • Mongoose Binary Free Edition (‘the easiest to use web server on the planet’). Download it from https://www.cesanta.com/mongoose.

Getting Started (Windows 7)

Copy the Mongoose Free executable file to a newly created folder in an accessible location such as the Desktop.

Open Waypoints. It will start up with a basic demo scene already loaded. Click ‘Export HTML’ (at the bottom of the panel on the right). Save the file in your Mongoose folder.

Minimise Waypoints for the moment and browse to your Mongoose folder (it should now contain a copy of Mongoose Free and a file called index.html). Double click the Mongoose icon and index.html will open on your computer. Ignore that, and check the system tray for a yellow Mongoose icon. Click the icon, and look for a menu entry that begins ‘Go to my address:’. Carefully type the given address into the browser ON YOUR MOBILE DEVICE and the demo VR scene should load. Attach your VR viewer to your device and you should be good to go (you may need to turn around to find the scene). Keep the floating crosshair aligned with one of the cyan spheres for one second (until it fades out) and your virtual viewpoint should animate to that location.

So long as Mongoose is running, all you need to do to update the scene on your device is make changes in Waypoints, overwrite index.html, then refresh the browser on your device. Once set up, it should be quick and easy to experiment using this method. To stop Mongoose, just click its icon in the system tray and choose ‘Exit’.

Note: University machines will require administrator permission to run Mongoose properly as it requires firewall changes; you will need to get one of the technical staff to open a port for you.  Alternatively use your own laptop which you will (presumably) have administrator access to.


Importing Models and Textures

Drag and drop a 3D model (.obj format) or a texture (.jpg or .png) onto the window to replace the currently loaded model or texture. To import multiple objects, you will need to export them from your 3D modelling software as a single .obj file. Waypoints does not currently import normals or provide realtime lighting, so your model must be UV unwrapped and textured. Lighting and materials can be ‘baked’ into a single texture as per the demo scene. The pixel dimensions of your texture should ideally be powers of two (256, 512, 1024 etc) and your texture should not exceed 2048 x 2048 pixels in size. 1024 x 1024 is the recommended maximum, and should allow for a reasonable amount of detail.

Instructions on how to generate UV mapped textures varies between 3D applications; see this link for instructions on Baking Materials in with Blender


Top Viewport

The top viewport gives an overview of your scene.

  • Left mouse button – rotate view
  • Middle mouse button (or mouse wheel) – dolly in/out
  • Right mouse button – track left/right, pedestal up/down


Left click a waypoint to select it, and drag the transform gizmo to move it around.

  • Red arrow – x adjustment
  • Green arrow – y adjustment
  • Blue arrow – z adjustment


  • Yellow plane – xy adjustment
  • Cyan plane – yz adjustment
  • Magenta plane – xz adjustment


Note that the coordinate system used (which is dictated by WebGL) may differ from your 3D modelling software.

The amber coloured pyramid extending from the currently selected waypoint represents the extents of the view from that location. This view is always displayed in the bottom viewport.


Bottom Viewport

The bottom viewport shows the view from the selected waypoint. Drag the view to look around and find out what will be ultimately be visible by turning your head in the exported VR scene.


Panel on Right


Drag values up or down to modify them, or click to select then edit using the keyboard.


  • World > Hue / Saturation / Brightness – Set the background colour of the scene.
  • Waypoints > Hue / Saturation / Brightness – Set the colour of the spherical markers
  • Waypoints > Sphere Diameter – Set the diameter of the spherical markers. If your waypoints are spaced a long way apart, or you have chosen a wide angle focal length setting, you may need to increase this to enable the viewer to easily get a ‘lock’ on distant waypoints using the floating crosshair.


Selected Waypoint > X / Y / Z – Another way of positioning the selected waypoint.


Camera > Pan / Tilt – Rotate the camera. These settings will have no effect on the exported scene, as the camera orientation will be controlled by device orientation.


Camera > Focal Length – The focal length of the camera – in other words, ‘zoom’. Lower values = wide angle lens / wide field of view / exaggerated perspective. Higher values = telephoto lens / narrow field of view / flattened perspective.


Stereo > Separation – The distance between the two virtual cameras used to create the stereoscopic effect. Increasing this will increase the impression of depth in the exported scene, but at some point it will become difficult or impossible for your brain to fuse the left / right images.


Stereo > Projection Plane Distance – Objects closer than this will appear to pop out of the screen toward you, while objects further away will appear to be ‘behind’ the screen.


Not all combinations of Focal Length, Camera Separation, and Projection Plane Distance will work, and small changes can quickly destroy the 3D effect or make for an unpleasant viewing experience. Aim for viewing comfort rather than ‘extreme 3D’. Further technical info on these parameters can be found here:

http://paulbourke.net/stereographics/stereorender/


Export > Export HTML – Export your edited scene for viewing using Google Cardboard or similar (see ‘Getting Started’ above).


ArcGIS – Software for Students

ArcGIS 10.3.1 for Desktop is now available to students.  Full hardware / software requirements are here but broadly you need a PC running 64 bit Windows 7, 8 or 10.  Apple OSX is not natively supported though virtualised and BootCamp versions of Windows have been seen to work.

There is a form that must be filled in before you can have access to the ArcGIS install DVD.  Once you have filled in this form then it should be given to your ArcGIS tutor

ArcGIS Student Copy Application Form

The software can then be obtained in the form of an ISO file which you must burn to DVD or install via a virtual CD drive (advanced)

How to burn an ISO from Windows 7

Advanced users may want to install without burning a DVD by utilising “virtual drive” with Magic Iso

Once you have your DVD (or virtual DVD) you can use this PDF file to carry out the installation.  Note: The procedure here is written for ArcGIS 10.1 – it may differ from 10.3 cosmetically but the procedure is the same.

ArcGIS-Desktop-10-Installation-2013-2014


Top Ten Printing / Plotting Issues

Here are some common issues and solutions that can occur in the computing areas:

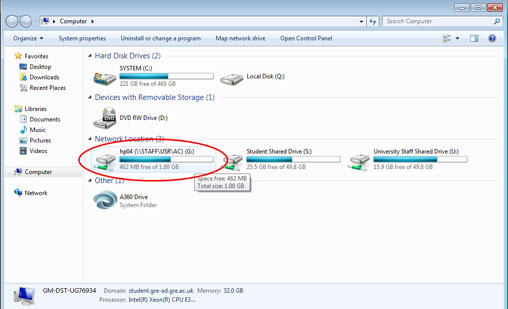
Issue: Print is sent but but the PCounter Popup window telling you the print cost *DOES NOT* appear

Solution: Check your G Drive – if there is no space free there then delete some files (click start – my computer – look at “G” drive).  Look in your documents folder, desktop etc. Delete or move files so that G drive does not show red.

g-drive

Start – Computer
If your G Drive shows up in red then you are too low on space

[divider] 

Issue: Nothing is printing, but the PCounter Popup window telling you the print cost *DOES* appear
Solution: CHECK BALANCE has credit (you can check by trying to print an a4 and watch what the popup says; then cancel the print).

Note: if your print is going to cost more than what is in your account then it will NOT print your file.  If you then top up your account you will have to send it again.

[divider]

Issue: The correct printer / plotter does not appear in the drop down list:

Solution: Printers are meant to be setup on login; if this doesn’t happen you can force them in using this method:
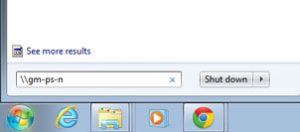
– Press the Windows Start button
– In the search programs and files text area type \\GM-PS-N

gm-ps-n

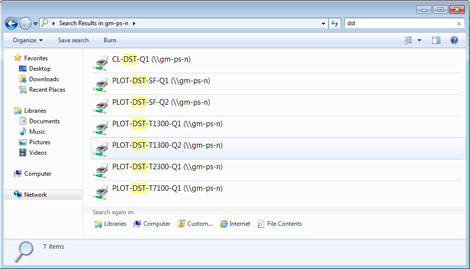
– This brings up a window with a list of lots of print queues – in the top right hand search windows type DST
– This shows only the printers in the print area; double click the one you want to print to

printer-list
– The printer queue is installed and will now be available from the print choose drop down menu
– NOTE: to add the A3/A4 colour / mono MFD printer type in MFD into the printer search windows instead of DST and choose the printer GM-MFD-STU-COLOUR

[divider]


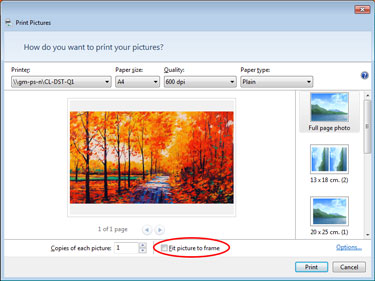
Issue: Printing files from Windows Photo Viewer but image prints out small in the corner
Solution: always untick the Fit Picture to Frame click box

dont-fit

[divider]

Issue: PDF not plotting at all / plotting with chunks of graphics missing but taking money
Solution: Complex or large PDF files can be cause problems for printing; e.g. if they have many layers in them.  Tricks to get around problem PDFs include:

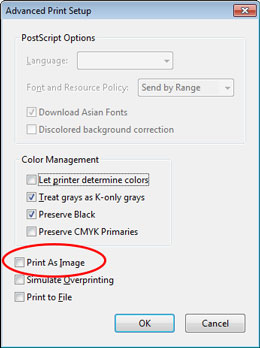
– In Adobe Acrobat from the print dialogue select Advanced then Print as Image

print-as-image

– In extreme cases you can drag the PDF file into Photoshop.  This will rasterise it to make it a flat image (if you keep the resolution at 300dpi there will be no loss of quality or sharpness).

[divider]

Issue: Sheet feed plotter – someone’s file is ready to print but they are not there to print it and someone else is waiting.

Solution: if someone has a job ready to go but they have not come to feed the paper then please wait at least 10 minutes for them to come back. Then either:

a) Be kind and feed a sheet of paper for them

b) Be unkind and ask one of the support staff to cancel that job


Baking in Lighting and Materials for use with VR Headset

For 3d models to retain their texture mapping and lighting when translating into VR compatible files you need to “bake” these textures into your model first.  Otherwise the model will just show as a flat solid white colour.

The process for this varies according to the 3d software –

 This is the process for Blender (tested in version 2.76)

blender

Create your model, add materials and set up lighting as required.

– Note: Stick to ‘Diffuse BSDF’ and ‘Emission’ surface types when creating materials.

Combine multiple meshes by selecting them and pressing Ctrl + J (not crucial but seems to simplify things). Then:

  1. Unwrap the mesh (3D View)
    Select the mesh, press space, start typing ‘Smart UV Project’. Choose it from the list when it appears and click OK
  2. Create an image to bake to (UV/Image Editor window)
    Click the ‘New’ button to create an image. Name the image (eg ‘baked’), leave the width and height at 1024 px, uncheck ‘Alpha’ and click OK.
  3. Select a material (Properties window > Material settings)
    Select a material from the list at the top.
  4. Set image to bake to (Node Editor window)
    Click Add > Texture > Image Texture then, in the orange-highlighted ‘Image Texture’ panel that appears, click the small image icon and select the image that you created in step 2 (‘baked’).
  5. Repeat steps 3 and 4 for every material used by your mesh.
  6. Bake materials and lighting (Properties window > Render settings)
    Scroll down to the ‘Bake’ settings, uncheck ‘Clear’ and click the ‘Bake’ button. Noise can be reduced by increasing the number of render samples under ‘Sampling’ in the render settings.
  7. Save the baked image (UV/Image Editor window)
    Click Image > Save As Image.


Summer Opening Hours

These are our opening hours over the Summer 2015 July – September

First Floor Design Studios and Computer Areas

Monday – Friday 8.30 – 6.00PM

Weekends: Closed

Please note that machines and plotters are being re-installed / moved / upgraded so there may be interruptions to service


Photo Studios and Animation Rooms

By appointment only – please mail Robbie first


Model Workshop

By appointment only – there is a lot of equipment going in here.  Please mail Owen first


TV and Film Studios

Please mail the TV Team for access

Laser Cutting: Preparing the File

File format required is Adobe Illustrator (any version)

You can import many common file formats into Illustrator for preparation; e.g. AutoCAD DWG, DXF, Adobe PDF

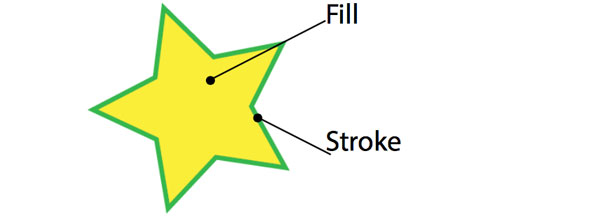
Illustrator objects are made up of FILLS – the inside of the shape – and STROKES – the outline. Correct preparation of the Illustrator is all about the stroke colour and thickness:

lasercutting-strokefill

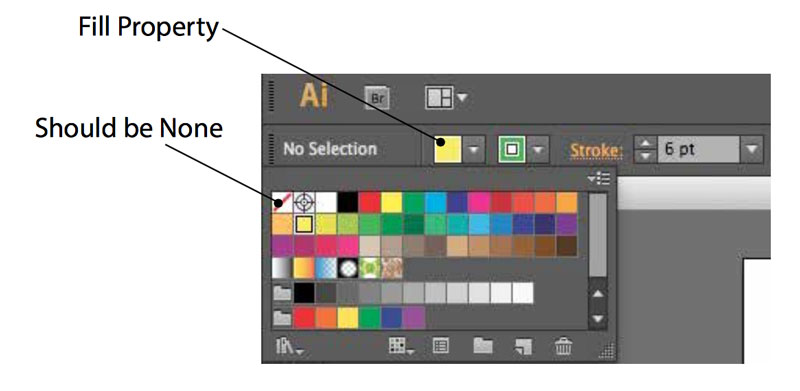
Fills are only relevant to laser cutting if you want to engrave solid areas, for straightforward line cutting and etching none of your objects should have fills; if necessary set the Fill property as “none”

lasercutting--fill

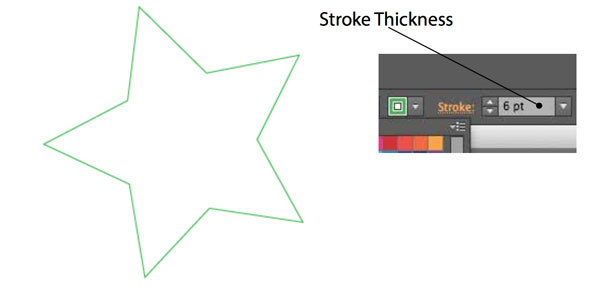
The Stroke sets the colour and thickness of the graphic and this is what directs the laser cutter to etch or cut – the stroke thickness needs to be 0.1pts

lasercutting-strokethickness

Colour of the stroke is important too – and it has to be a particular type of colour: RGB. It is best if you set you Illustrator document to RGB color space with:

File -> Document Colour Mode -> RGB

Then open up the colour window

Windows -> Colour

The look varies between different versions of Illustrator but the function is the same.

lasercutting-colourguide

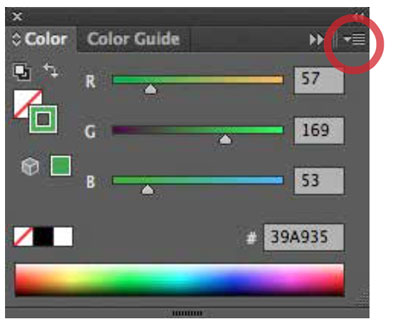
Make sure the swatch is set to RGB by clicking and selecting from the little down arrow in the top right hand corner (circled).

Now when you select a graphic in the drawing its colour value is shown – and can be changed – from this window

The colours you are most likely to be using here are Red – for cutting, and Blue – for etching. Black works too but that is for a much slower raster etch where it will draw one dot at a time.

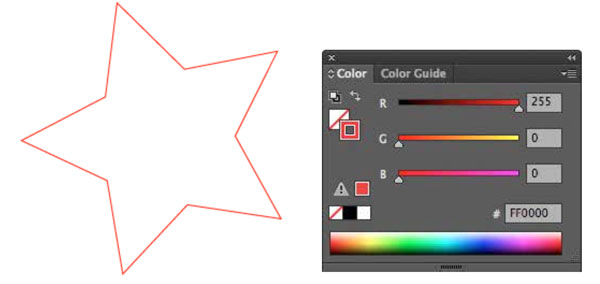
Select your graphic and set it at RGB Blue or Red by setting the RGB values in the Colour Window at

Red
R: 255 / G: 0 / B:0

Blue
R: 0 / G:0 / B:255

lasercutting-checkcolour

This star is now proper RGB red, at 0.1 stroke thickness. If this was sent to the laser cutter it would cut out a shape of a star in the materi- al. Had it been drawn in RGB blue it would etch a drawn shape of the star into the material.

You can do a select multiple objects – or even all of them – and set their colour correctly all in one go. Keep an eye on the Fill property while you do this and make sure it really is None and not just white.

The example above is a very simple one; but problems are likely to arise with more complex shapes and drawings that come in from oth- er sources. Typical issues are:

Multiple Lines

This is when there are two or more lines on top of each other. It often occurs when drawings are brought in from a big AutoCAD file. What it would mean is the laser going over those lines again and again cre- ating inconsistent width lines (and taking longer to complete).

If it is just two lines on top of each other you could probably get away with printing it anyway, if there are more then you really should de- lete the duplicates. Unfortunately this can be a tedious job; a couple of things that might help you are

  • The AutoCAD 2013 has a tool called “Overkill” that will detect and delete duplicate objects in a selection set. Just type “overkill” then follow the prompts.
  • In Illustrator you could window select an instance of multiple lines, then shift select, to deselect the top one, then hit delete to delete all but that one.

Nested Groups

An Illustrator file that appears to be non-filled lines may still have fills and wrong line-weights hidden inside groups. This is quite common in stock illustrations grabbed off the internet. You may have to ex- plode groups to investigate this.

Errors like this will show up when you bring your file into the laser control software –

If you have lines to be cut in red, or etched in blue and they preview in the laser software as black then they won’t laser in the proper way.
The onus is on you to go back and investigate!


Advanced Laser Cutting

Here are some interesting examples of laser cutting where software techniques are used to slice a 3d computer file into 2d shapes to be cut for re-assembly as a physical model.


The free Autodesk software 123DMake will import a 3d file (.STL) and then generate 2d cut-able parts that are used to construct the model. It can do this in a variety of styles:

Stacked Slices

The model is simply divided into slices that are assembled on top of each other to form the shape.  Typically the model is sliced horizontally but the software does give the option to change the slice angle so the shapes run front to back for example.  This is the easiest type of model to assemble and gives the most accurate form, it’s likely to create the most amount of cutting though

stackedslice-3ds

This was a quick 3d studio model (render on right) – a lofted circle shelled with much twist / bend / taper modifiers applied to it.  The laser cut model looks (and feels) a lot better than the stark flat computer render.

stacked-zaha

A version of Zaha Hadid’s Heydar Aliyev Centre in Azerbaijan.  The 3d model was downloaded from 3D Warehouse and fixed in 3D Studio (3d Warehouse models often need repairing before they are ready for cutting).

stacked-skulls

A skull model that was actually captured using iPad 3d scanner software (another free piece of Autodesk software called 123Capture).  This takes many photos of the shape and creates a 3d file from that information.  The file can then be brought into 123DMake and made into cut layers.

In this model each layer has been padded with a piece of card – that card should actually have been thicker as the skull still looks a little squashed.  On the right is a photo of the same model (proper dimensions) printed on the z450 3D printer.

stacked-head

This model was printed on 1.5mm grey card and gives a quite smooth version of a head.  The model has been smoothed on the right hand side by sanding and Dremeling it down – however the dirty, rough non sanded version is has a nice textured quality that is lost on the clean and smooth version.

Slotted Slices

In addition to the relatively straightforward stacked slices the 123DMake software can also generate model cuts in a more figurative way:

slotted-slices

In this image the model on the left is the original followed by three possible variations of “interlocked slices”, “curve” and “radial slices”.  The parameters for each can be tweaked to alter the number of slices and spacing – this could be useful for mimicking floors / storeys in a building model.

Here is a real version of a radial sliced model, using 1mm grey card.

slotted-head

This radial slice version of the “Walkie Talkie” building in Fenchurch Street London had a shell modifier in 3D Studio applied to so it is just a thin hollow shell. The slice operation then creates a skeletal form rather than solid planes.  The result is quite striking and only uses a small amount of material.

lasercut-walkietalkie

These types of models do use less material but they are more difficult to assemble – like a 3d jigsaw.  With complex shapes with gaps in the middle slices have to be put together in a particular order – the software in fact has a feature where it will show the order to put them in.

The slot models are less detailed than the stacks and are not suitable for all situations for example if more detail is needed.  They can make for very interesting conceptual models though.

Folded Panels

The software also has the option to create a paper model version that can be folded and glued together.  It is an appealing idea for quick, cheap paper models but the reality is that it’s only the simplest of shapes that produce a usable result.  Here is what the software makes of head shape and simple house shape

folded-slices

The head would be quite difficult to fold together correctly and probably would not give a great result.

Materials

These models could conceivably be cut on any laser-cut material, e.g plywood, acrylic, cardboard, etc. – the software does allow for the required layer thickness to be altered to match.  For the slot models it is a lot easier to work with a material with some flexibility like card rather than a rigid material as the parts do need to slide together and interlock.  For a more advanced project a mixture of materials could be used, for example wood for the horizontal slabs and clear acrylic for the uprights.

The interlocking models ought to fit together with no glue needed whereas the stacked models do need to be glued – this can take some time and patience.   Complex multi layered models would also mean a lot of cutting so although a cost saving could be made on using cheap materials like cardboard, the actual cutting time can be long, especially when multiple sheets area required to be cut.

3D Print Preparation

Note: This guide refers to the z450 3D Printer and its specific software Printer but the general techniques and ideas are appropriate to both machines.

Before models can be printed on the z450 3d Printer they need to be converted to “.zbd” files.  This file type is used by the 3d Printer’s “zPrint” software.  zPrint can import a wide range of 3d file formats, but the following three are common and recommended:

  • STL – Stereolithographic
  • 3DS – Autodesk 3ds
  • VRML – Virtual Reality Modelling Language

All 3d software can export with at least one of these file types as an option; in fact some software includes a “publish to 3d printer” option.  Here are some examples of generating zPrint friendly files:

Sketchup Pro:

File – Export – 3D Model [Export Type: 3DS File]

Rhino

File – Print 3d – Z Corp ZPrint

If Rhino detects zPrint software is installed then it exports the model as a vrml file and opens straight into zPrint

OR

Select the object then choose

File – Export Selected – [STL/VRML/3DS]

AutoCAD

File – Publish – Send to 3D Print Service – Continue – [select model]

Saves as STL file and tries to connect you to online 3d printing service which you can cancel; the STL file is saved and importable into zPrint

OR

File – Export – Other Formats – [choose Lithographic STL] – [select model]

3D Studio Max

File – Export – [STL or 3DS or VRML]

The zPrint software is installed on all machines in the digital studio; it is also available to students who want to install it on their own machines.

Bring the Model into zPrint

When you have your STL/3DS/VRML file you can bring it into zPrint. In zPrint select

File – Open – [select the file]

zPrint shows you details of the model you are importing

If the model comes in at a size that will fit into the 3d printer then the file opens straight away, otherwise you get an extra dialogue box prompting you for resize options.

If you know the actual dimension you want the model to print out at, you can enter them here – note these are dimensions of the overall extent of the model; the total height, width or length that the model reaches.

Alternatively you can just put in a percentage figure – this is useful for making the model to scale; i.e if you modelled correctly in Autocad then you can bring in a 1:100 version by setting the scale at 1%

Don’t worry about getting your figures exactly right here – it is still possible to rescale the model after it has been brought into zPrint by right clicking on the model and selecting scale. 

You can swap between the units of inches or mm by selecting

Settings – General Preferences

Checking the 3D Model for Errors

By far the most common problem with preparing 3d models for printing is flipped normals, also referred to as reversed faces.  This is when one or more surfaces of the model is “inside-out”.  Even though a model with flipped normal may still render properly it will cause problems when 3d printing.  A flipped normal in zPrint is indicated by a dark area: Here’s a correct and incorrect model brought in from Sketchup

Correct and Printable
Incorrect and won’t print Properly

An additional tool in zPrint allows you to view the cross section of the model – you can slide a section line up and down to view how that layer of the model will appear to the printer.  This should show solid black areas where there is something to print.  Viewing in this mode is very useful as it can really highlight problem areas – the 3d imports don’t always work and using the section view lets you view and check exactly what the printer will send at each layer.

Select this viewing mode by selecting the 2D button to the right of the tool bar

In the screenshot above you can see that the software is misinterpreting the model at that section point – there are two white voids running through the model, which should not be there; the presence of a flipped normal elsewhere has thrown out another part of the model. If this model were to be sent to print it would print wrong.

Fixing Flipped Normals

Simply put, it is a lot easier if there are no flipped normals present in the first place.  There are tools in 3D software to reverse faces but unless they are simple it can be time consuming and frustrating to attempt a repair – it may work out easier to remodel the incorrect part.

Here are some pointers to repair options [Note: often fixing one face results in another face somewhere else in the model that was correct then becoming incorrect]

  • Sketchup:
    change View – Face Style to monochrome, and look for blueish grey faces. You can right click on these faces and choose Reverse Faces.
  • 3D Studio:
    select the part and choose the normalise modifier and Unifiy Normals
  • Rhino 3d
    type “flip” and select the surface

Pricing the Model

Cost of the final model depends on what volume of powder is used in making it. At time of writing [autumn 2010] the price is £2.50 per cubic inch.

In zPrint you can find out the volume of your model [after setting the units to inches] by selecting

View – Calculate Part Statistics

In the example above the total volume of parts is 8.38 cubic inches;

8.38 x 2.5 = £20.95

You can reduce the cost of your model by:

  • Scaling down the size of it: right click the model, select scale and put it at 75% will bring the volume / price down considerably (though be sensible about how useful a much smaller model would be)
  • Add voids: a solid box will be a large volume and cost a lot but if you subtract a block out of the bottom of it then that is that much space that you are not printing. Two important notes here:
    • Don’t void it so much that the walls are all wafer thin as it will break
    • Don’t void the inside of a shape without leaving a weephole for the loose powder to get out – the 3D printer will re-use any loose powder left over from a build, but if the powder is sealed inside a box then it can’t be extracted.
  • Shell it: the 3DS Shell modifier can sometimes help by allowing you to thin (and thicken) walls, though again be careful not to trap the loose powder inside walls.

After the Model has Printed

Typically a model is sent in the late afternoon to run overnight.  3D prints can’t be queued so they all go one after the other, but it is possible to put a number of models into one build so they can be sent altogether.

The next morning the model will be sitting in the printer build tray inside a cube of loose powder.  That loose powder then has to be manually vacuumed away leaving the solid model.

Next, the model is moved to the air brush area where remaining powder is blown away.

The final – though not always necessary – step is to apply a hardening solution (which is essentially superglue).  This is either administered with a brush or by dipping the model into a small trough filled with the solution.