This software will be of interest to teaching staff who are already confident users of MS Teams and Panopto. A full list of the University’s essential, supported and approved tools is available here.
Moving our teaching online has ushered in a wide range of changes to how we deliver our courses and modules. Apart from the pedagogical challenges in moving our teaching to the digital realm, there were technological challenges as well, chief among them the use of video conferencing software (for a majority of cases, Microsoft Teams). Although some choice is available in what can be shown on screen (for example, the educator via web cam; the main – sometimes only – screen; a PowerPoint slide set), these offer very little flexibility and control over what students can see. This in turn might limit what educators can actually do during a live session (or a recording). In fact, instead of such technology being enabling, it becomes limiting. But there is a way to make the limiting enabling again.
OBS (short for Open Broadcaster Software) Studio is a free open-source software that enables live video production. It is used by online content creators for both live-streaming and recorded videos and is available for Windows, Mac, and Linux operating systems. It allows for the creation and management of a variety of screen layouts (so-called “scenes”) where the presenter has full control over source/s, size, and location of its elements on screen. To start understanding how OBS can be used in conjunction with video conferencing software like Microsoft Teams, or recording software like Panopto, I will demonstrate how to set up two simple scenes, a shared-screen one both with me as a talking head in a bottom left corner and an overhead-cam one.
- Technical requirements
For OBS to run smoothly, there are some basic requirements that will enable it to start without errors:
| Windows | macOS | Linux/Unix |
| DirectX 10.1 compatible GPU Windows 8 / 8.1 / 10 | Intel CPU (PPC is not supported) OpenGL 3.3 compatible GPU macOS High Sierra (10.13) or later | OpenGL 3.3 compatible GPU X window system |
Further technical requirements are very much dependent on what exactly a tutor wants to do and show and would require a closer look at hardware encoders. For the three scenes we are about to set up, a basic modern laptop should be sufficient, but this may vary individually. Most issues with OBS streaming and recording quality stem from Central processing CPUs, GPUs, and RAM that are too weak to process the video quality. As an in-depth discussion of the software’s technical requirements is outside the scope of this blog, please consult the link above to learn more about hardware encoding.
2. Download OBS and use the auto-configuration wizard
Downloading OBS from their website is straightforward and available for the most-used operating systems Windows, macOS, and Linux/Unix. Straight after installation, an auto-configuration wizard window will pop up and ask what the programme’s intended use is (see Figure 1).
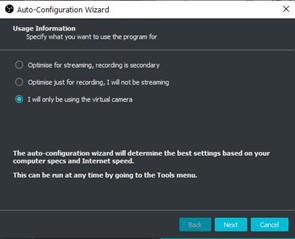
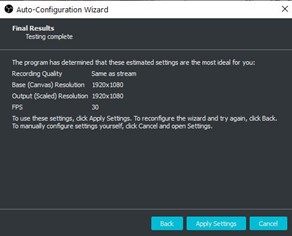
Figure 1: OBS Auto-Configuration Wizard – virtual camera selection and suggested settings
In the context of this article, we will focus on using it as a virtual camera, as we want to feed this into another application (MS Teams or Panopto). Selecting “Next” will show the final results of the OBS system test which may differ between computers. You can change these settings later (see later in this article), but as you get acquainted with OBS, there will not be a need to at this stage. The suggested resolutions come from the monitor/s in use, and the FPS (frames-per-second) are more than sufficient for the virtual camera. Selecting “Apply Settings” will complete the wizard.
3. Screen components – overview
Next, a base OBS screen will open. Figure 2 and Table 2 below highlight and explain these initial components:
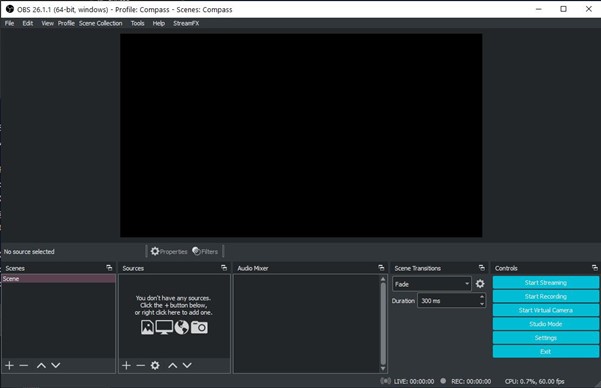
Figure 2: Initial screen of OBS Studio without scenes or sources set
| Screen component | Purpose |
| Screen preview/canvas | The preview window where the screen layout can be arranged as required. |
| Scenes | Contain specific layouts and enable switching between scenes to transition between layouts. |
| Sources | Define what is to be captured inside a given scene. This can be anything from web cams, images, text, active windows, displays, microphones, etc. |
| Audio Mixer | Offers control over the audio captured via microphones and/or desktop. |
| Scene Transitions | Transitional effects when switching between scenes (e.g., fade, cut, swipe, slide). |
| Controls | Buttons to start streaming, recording, virtual camera, studio mode, settings, or exit OBS. |
As the beginning OBS user will get more acquainted with these components, they will experience the wide range of options to change their appearances and uses. Free add-on programmes and plug-ins add extra components to OBS – examples are closed captioning (using Google AI), special effects for sources, remote-controls for scene transitions, and many more. However, for the purpose of this blog, we will be able to work with what came in the initial installation package.
4. Scenes and Sources
Scenes and sources are the bread and butter of OBS and will help to set up an overhead visualizer view on the presenter. Selecting the “+” sign on the bottom left adds a new scene. Figure 3 shows the addition of the “Overhead Cam” scene.
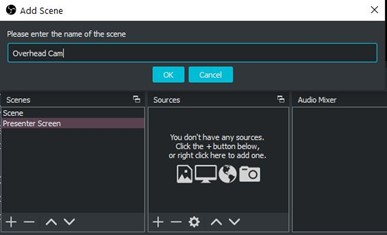
Figure 3: Adding a scene in OBS
Selecting the “Presenter Screen” scene allows the addition of various sources by selecting “+” in the Sources window presents a wide range of potential sources to the scenes, as Figure A3 shows. The variety of sources allows for the addition of audio, web browsers, displays, images, or specific windows currently open on the computer (Figure 4).
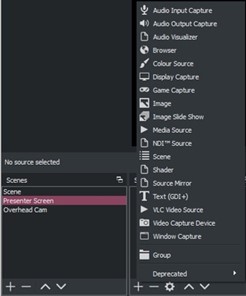
Figure 4: Selection of potential sources for the Presenter Screen scene
Adding a Display Capture source allows the presenter to use their main screen (often the only screen) to become the Shared Screen to show e.g., slides, documents, images – anything that can be shown on the main monitor. After selecting “OK”, the corresponding display can be selected and confirmed.
The face cam can now be inserted as a Video Capture Device source to add the talking-head feature often seen in tutorial videos. Selecting the main cam (provided there is a second one for the overhead cam later) will insert the Face Cam (Figure 5).
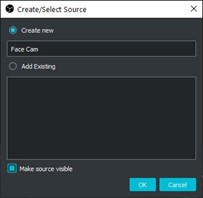
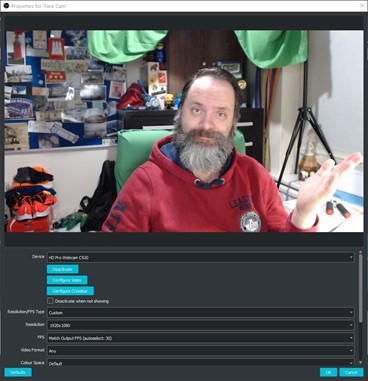
Figure 5: Adding the Face Cam as a source and its suggested properties
The rearranging of the two sources (face cam and main screen capture) can be achieved by dragging the handlers (the ones I am pointing at in Figure 6 below) and resize it.
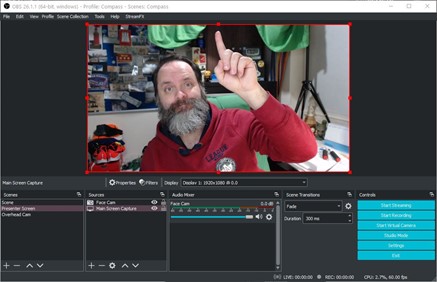
Figure 6: Adapting the scene using handlers
To crop out parts of the face cam view, it is necessary to hold down the Alt-key whilst using the red handlers accordingly. A bit of trial and error at this stage may lead to a layout like the one shown in Figure A7. It needs to be noted that I have added a so-called Chroma Key filter to my face cam, which together with a green screen in my home office allows me to blend in with the background. This is not a necessity, however, and is outside the scope of this article.
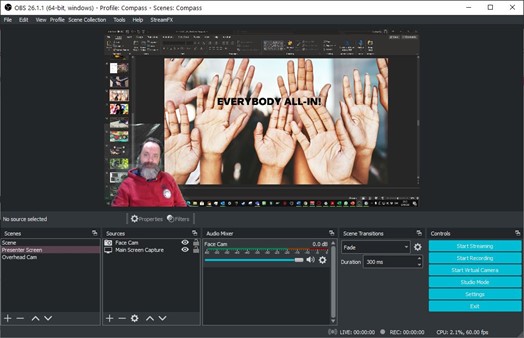
Figure 7: Talking head feature over main screen
The layout of the Overhead Cam scene can be designed in a similar fashion and requires another Video Capture Device source. A second webcam mounted above the desk (in my case) or above any other suitable surface will achieve that effect. However, as the first part of Figure 8 below shows, this looks off in my case due to the way the overhead cam is mounted on a shelf atop my desk. To achieve that “over-the-shoulder” view rather than the “from-the-front-and-top” one, the view has to be modified (“transformed”) by flipping the image vertically and horizontally.
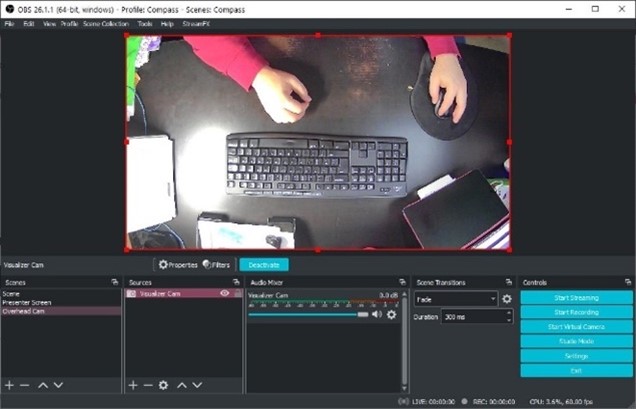

Figure 8: Initial overhead view and flipped view for the over-the-shoulder effect
The two scenes enabling a switch from a shared-screen with the presenter as a talking-head in the bottom corner and an overhead view on the desk to perform role-playing and games and using props is now possible, with the scenes seamlessly transitioning back and forth between them. It would be a simple task now to put another talking head into the overhead scene, resize it, move it to a different place on the screen – with OBS, this is a quick task once the respective screen layout has been decided on.
Table A3 summarizes the scenes, intended layout, as well as the sources to be added for the purposes of enabling a shared screen and an on-desk display via overhead cam:
| Title | Intended design/layout | Sources |
| Presenter Screen | Shared screen with a talking head in the bottom left corner | Face cam (video capture device) Main Screen Capture |
| Overhead Cam | Visualizer | Overhead Cam (video capture device) |
For this simple setup, it is not necessary to define audio capture devices (like a microphone) because of its intended use as a virtual cam feed into MS Teams or Panopto. Any audio would be captured by the video conferencing software directly. Therefore, the Audio Mixer component that is also visible in OBS, used to set the volume of individual audio sources, can be safely ignored at this point and for the purposes of this blog.
5. Controls – Virtual Camera
The Controls component enables various pathways to output the scenes created. They can be either directly live streamed to platforms like YouTube or Twitch (given the correct streaming settings), recorded and saved to the computer, or output as virtual cam. It is also possible to live-stream, record, and output as virtual cam at the same time, or any combination thereof. However, this would put added strain to the CPU. To output our scenes to MS Teams or Panopto, we will select “Start Virtual Camera”. The feed from OBS is now usable in any video conferencing software that allows use of a webcam in their corresponding settings (see Figure 9):

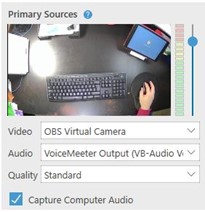
Figure 9: Using the OBS virtual camera in MS Teams and Panopto
Switching between scenes can either be done in OBS itself by selecting the desired scene, via keyboard hotkey shortcut that can be defined by the user (this is possible for any task or command in OBS), or via a remote device. These devices can be physical one’s, for example, the Elgato StreamDeck or, if those are prohibitively expensive, via apps such as TouchPortal or Deckboard.
The possible applications of OBS as a virtual cam are not limited to MS Teams or Panopto. Any application that allows use of a video feed can access the OBS Virtual Camera instead of an in-built one or external one.
If you want to learn more about OBS and how it can be useful to you, subscribe to Gerhard’s YouTube channel and follow his ongoing YouTube video series on OBS in Higher Education.”
If you are interested to find out more on what pedagogical practices were enabled by this technological adoption, you can read my recent full article “’All the world’s a stage’ – the Open Broadcaster Software (OBS) as enabling technology to overcome restrictions in online teaching” in Compass: Journal of Learning and Teaching.
Dr Gerhard Kristandl
Senior Lecturer in Management Accounting, Faculty of Business, University of Greenwich