Category Archives: Scan Projects

Scan Project: Reproducing 19th‑Century African Artefacts Through Photogrammetry and 3D Printing

This is a project to replicate 19th century African artefacts currently held by the Royal Greenwich Heritage Trust.

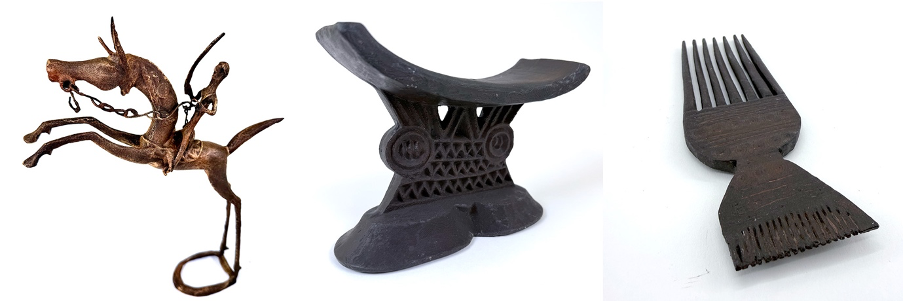
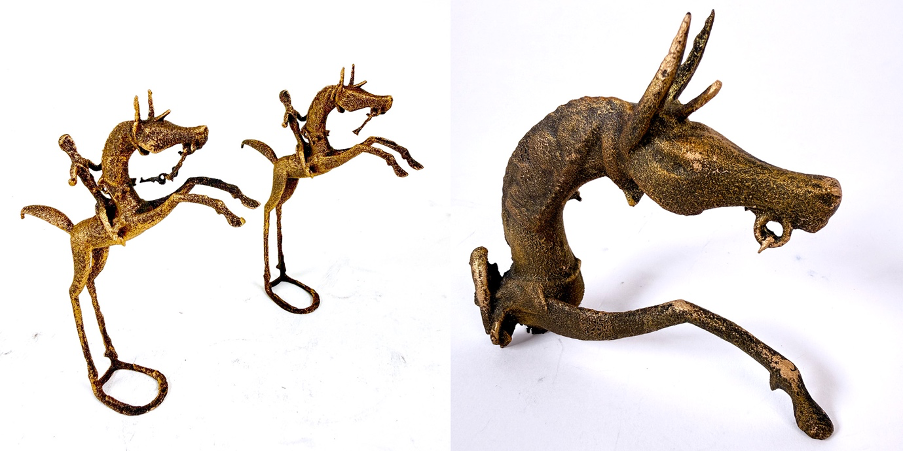
The workflow is: scan, 3d print and then authentically finish these historical items; an East African carved wooden headrest, a series of wooden hair combs, and bronze horseman sculptures. Together, these objects offer a range of material and surface qualities, from worn hardwood to aged metal, making them ideal for testing the full photogrammetry‑to‑copy workflow.

Rather than aiming to produce pristine, as-new replicas, this project focuses on how digital and fabrication processes can retain – and even amplify – traces of age, handling, and material character present in the original objects.

Photogrammetric Capture

All artefacts are captured using DSLR‑based photogrammetry. This approach allows for flexible image capture that adapts well to differing shapes and surface finishes.

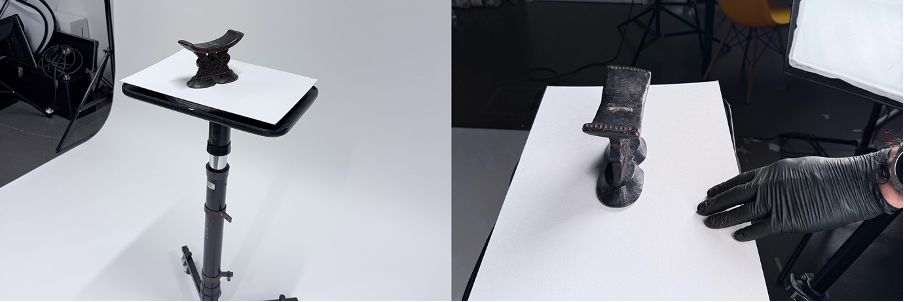
Each object is photographed from all angles using a consistent lighting setup, ensuring strong image overlap and even exposure. Particular care taken with the bronze horseman, where reflective highlights can easily interfere with surface reconstruction. Diffuse lighting and careful camera positioning help minimise glare while still preserving subtle form and texture.

The carved wooden artefacts – the headrest and combs – are more straightforward, but the shallow relief and worn surfaces still require dense coverage to avoid soft or ambiguous geometry in the resulting models. In practice, capturing more images than strictly necessary consistently results in more reliable reconstructions.

Digital modelling and cleanup

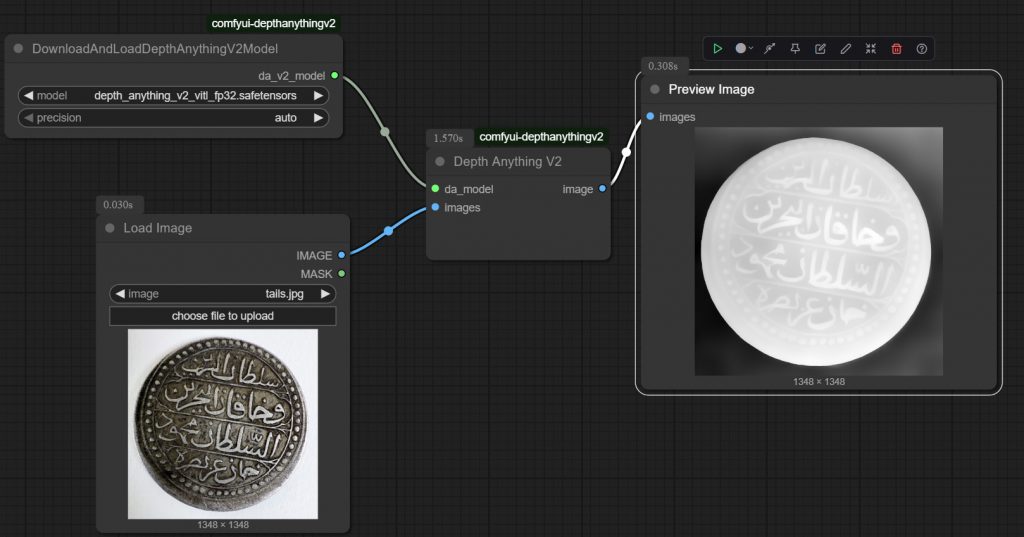
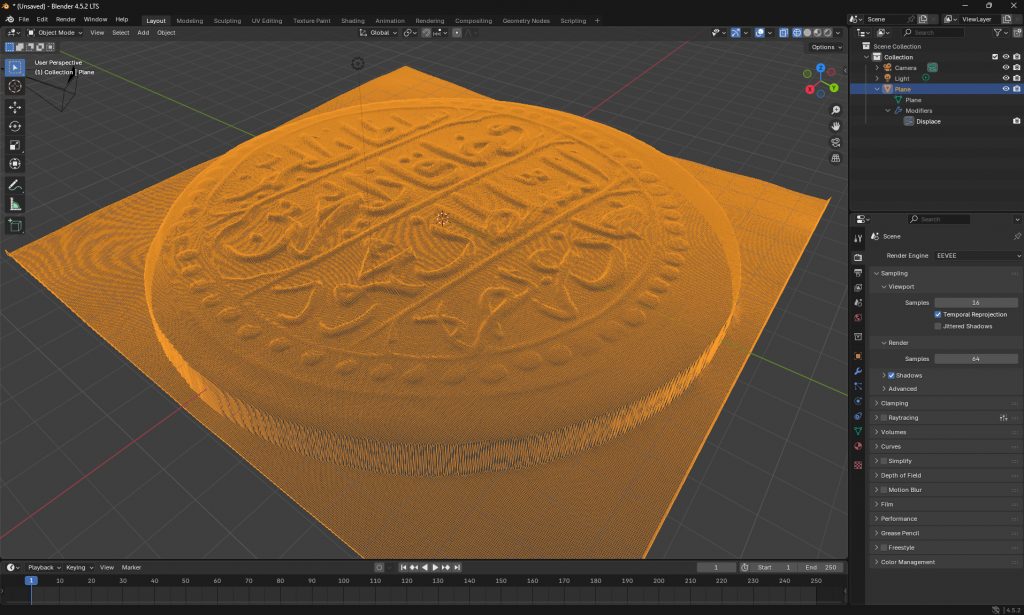
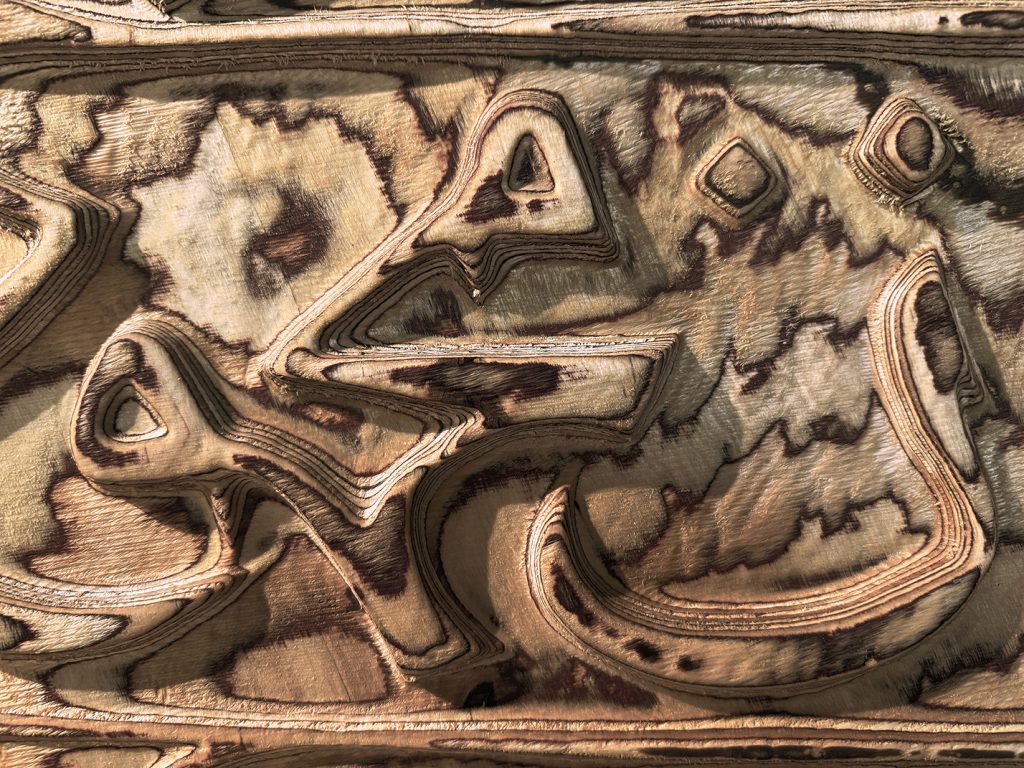
The image sets are processed, via the photogrammetry software Reality Capture, into dense 3D meshes, followed by light digital cleanup in 3d editing software Blender. This stage is kept light – occlusion holes and obvious artefacts are addressed, but surface irregularities are largely preserved. This reflects an photogrammetry not as a means of achieving visual perfection, but as a way of retaining material history. Minor distortions introduced through capture can echo the wear already present in physical artefacts. Excessive smoothing risks replacing these qualities with an artificial digital uniformity.

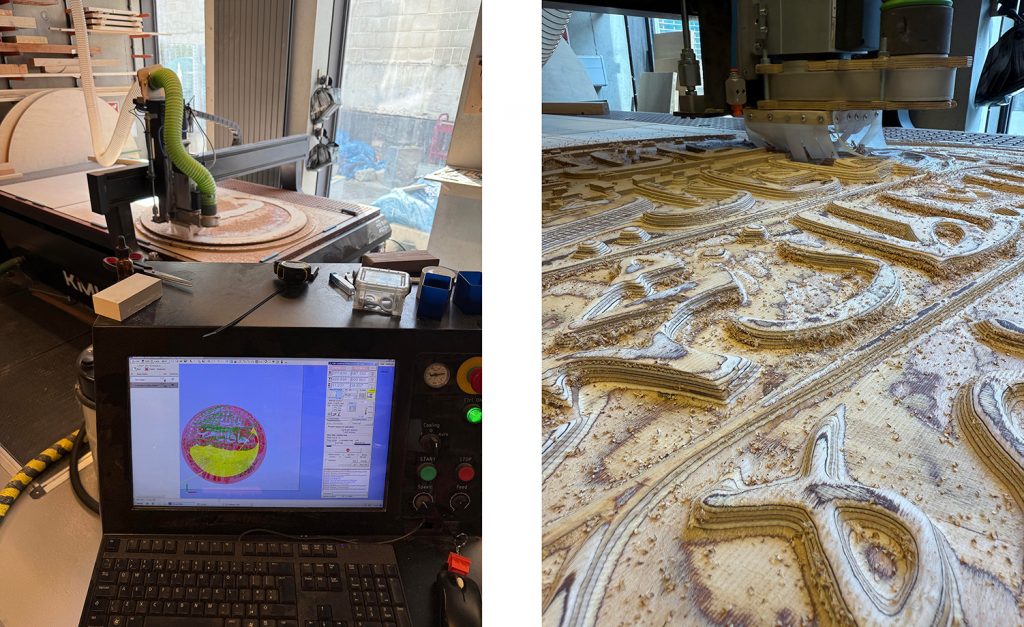
Fabrication: choosing different printing processes

Each artefact here is fabricated using a different 3D printing technology, selected based on form, scale, and desired surface qualities.

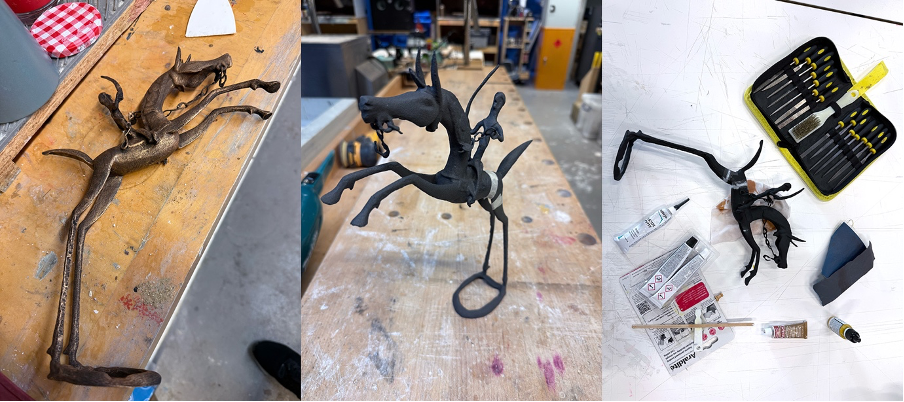
The bronze horseman is printed on a nylon SLS (powder) printer. Due to its size, the model is produced in multiple parts and later reassembled. The slightly grainy surface typical of SLS prints becomes an advantage rather than a problem here, closely resembling the texture of cast metal.

The wooden combs are produced using a resin printer. This process builds objects by curing layers of liquid resin from the bottom up, resulting in extremely smooth surfaces once the supports are removed. This makes it particularly well‑suited to the fine teeth and delicate detailing of the combs.

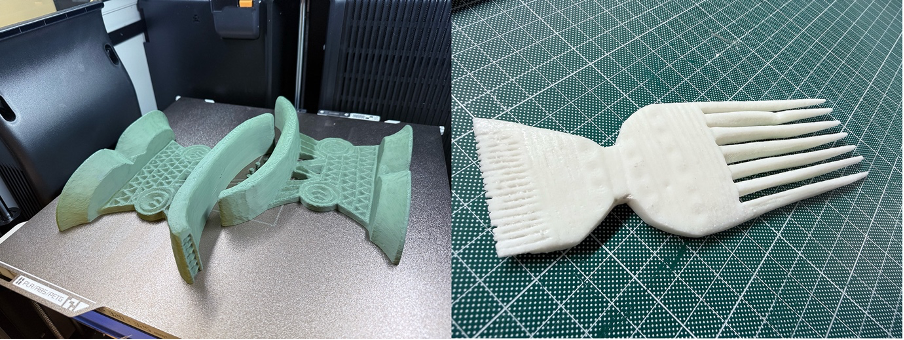
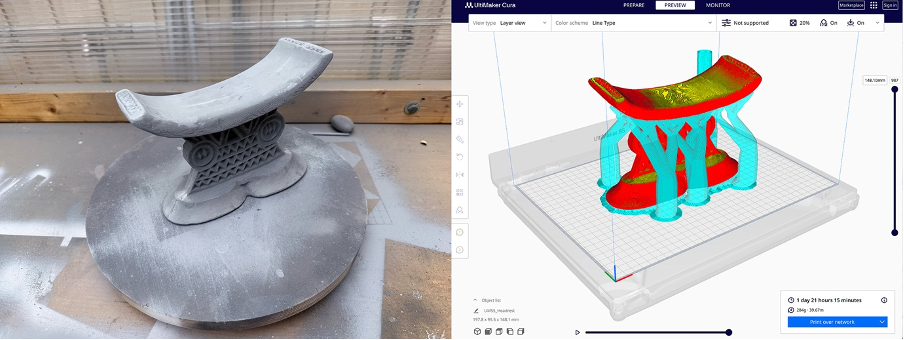
The headrest is printed on a more conventional FDM printer, which extrudes molten plastic in layers, building the object up gradually. It is printed in two halves and then fixed together. The visible layering produced by this method echoes carved tool marks, making it a surprisingly appropriate choice for a wooden object.

Surface preparation

Before finishing, all prints undergo a combination of sanding, cleaning, and under‑coating. Preparation varies depending on material, but the intention is never to eliminate surface traces entirely.

Light sanding removes sharp artefacts while leaving enough texture to contribute to realism. Some pieces receive a single coat of filler primer, which is then sanded back so that it remains primarily in deeper print lines. This softens the surface without erasing its character.

Painting and finishing: simulating aged wood

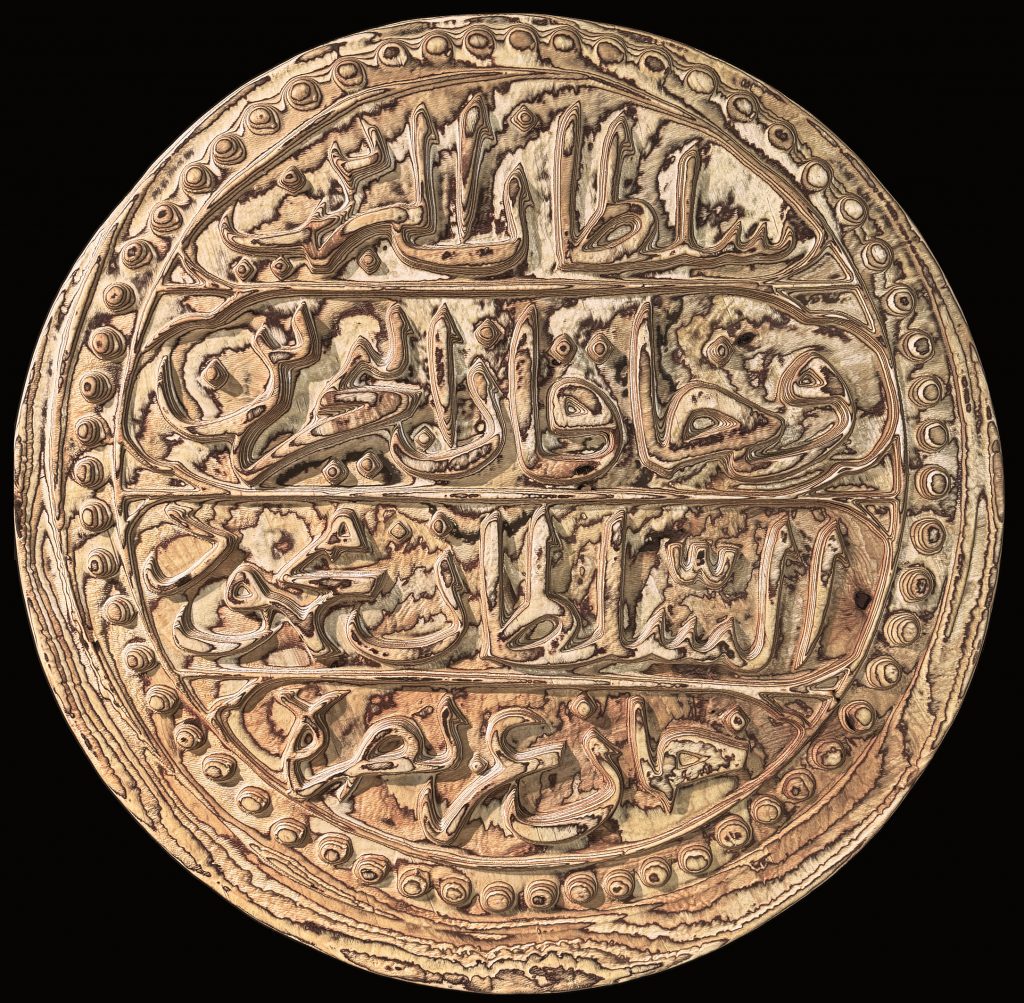
The headrest and combs are finished using layered paint techniques designed to suggest aged hardwood rather than freshly finished timber.

A dark, warm brown base coat provides an initial foundation. From here, multiple diluted washes are applied, allowing pigment to settle into recesses and carved details. Raised areas are selectively blotted back, reducing the “plastic” appearance of the prints. Some judicious use of a nail to physically carve deeper into some grooves too.

Very restrained dry‑brushing is used to pick out edges and ridges. The emphasis here is subtlety – highlights that are obvious quickly undermine the illusion of age.

To finish, a neutral shoe polish is applied to areas that would naturally be handled. Buffed gently, this creates a soft, uneven sheen associated with skin oils and long‑term use, rather than a uniform varnish.

Painting and finishing: the bronze horseman

The bronze horseman follows a different finishing approach. Rather than painting metallic colour directly, the model is first coated in matte black. This acts as a shadow base, ensuring that any paint missed in recesses reads as depth rather than exposed plastic.

Metallic colour is then introduced using Antique Gold Rub ’n Buff, applied through a dry‑brushing process so that pigment catches only on raised surfaces. This technique works particularly well with the subtle grain of the SLS print, creating broken highlights that resemble cast metal rather than smooth paint.

Age and wear are introduced through thin brown and ochre washes, which are allowed to pool in crevices before being partially wiped back from high points. This layering process avoids a uniformly “dirty” appearance and instead produces variation consistent with long‑term exposure and handling.

A final light touching of Rub ‘n Buff to the tips and sharp edges of the horseman to add the glint to these ends.

Conclusion

The resulting prints are not intended to replace the artefacts they are based on. Instead, they offer a way to examine how historic objects can be translated into contemporary materials while still retaining evidence of use, age, and making.

View Post↗

Scan Project: Coin Scan to large CNC model

A project to capture and reproduce an 18th-century coin from the collection of Michael Talbot, Associate Professor in the History of the Ottoman Empire and Modern Middle East at the University of Greenwich.

The original silver coin, just 28.7 mm in diameter, was transformed into a one-meter-wide replica carved from birch plywood.

  • Denomination:  1 Budju 
  • Material:  Silver 
  • Width:   28.7mm 
  • Weight:  10.37g 
  • Mint:   Algiers 
  • Year:    1239 (1824) 
  • Language:  Arabic 

The Arabic inscription reads:

“Sultan of the two lands and ruler of the two seas, the sultan Mahmud Khan, may his victory be glorious.”

Replicating the coin comprised of the following steps:

Capture the Image: 

Take a high-resolution, evenly lit, perpendicular photograph of the coin.

The original coin would have been struck by hand, here it has resulted in a slightly misaligned strike that left excess material, or ‘flashing,’ on the lower edges.

Generate a Depth Map:  

Convert the photograph into a grayscale depth map – an image where varying shades of black and white represent the coin’s relief (depth and height).

There are a number of techniques for estimating a depth map from a 2d image; traditional, rule-based / algorithmic techniques – and more recently AI neural networks trained on a huge datasets have proved very effective. 

Some examples of these (open source) models are Marigold, Midas, DepthFM. There are online versions of these that can be used – but in this instance DepthAnything was used to process the image locally.

Create a 3D Model

Apply the depth map as a displacement map onto a flat digital model to create a 3D surface. 

With the depthmap image as a PNG image, this can be applied as a displacement modifier in most 3D editing software then exported as an OBJ.

• Rhino – HEIGHTFIELD command, select the depthmap file. Increase the sample points to get a finer mesh

• 3d Studio – Select the geometry (cylinder) and apply DISPLACE modifier, load the depthmap image – use the strength parameter to control height of displacement.

• Blender – Add new mesh plane, subdivide the mesh in object mode many times, apply the displace modifier, create in that a new texture and open the depthmap image to apply it.

CNC Toolpath Generation

Import the .OBJ into CAM software to generate the toolpath – these are the digital instructions the CNC machine will follow to take the drill bit around the material fixed on the CNC bed.

CNC Machining: 

Run the CNC operation to carve the 3D coin shape from a block of plywood according to the toolpath. 

The CNC machine will perform a two-pass subtractive process: a roughing pass with a larger bit to remove the bulk of the material, followed by a finishing pass with a smaller bit for finer details.

The first pass took around 40 minutes, while the second pass took 6 hours to complete.

Finishing

Sand down any rough areas on the carved coin and apply Tung oil to finish the wood. 

The CNC process can leave fine tool marks, and rough surfaces; sanding smooths these imperfections, revealing the wood’s true character. Tung oil, a penetrating oil finish applied over 3 days, soaks into the wood fibres, making them appear richer and darker. This brings out the grain and enhances the contrast and visual depth of the wood’s natural pattern.

Scan Project: Crystal Palace Subway

  • 09-03-25 : 11.00AM : Overcast
  • Leica BLK2GO SLAM Scanner / Emesent Hovermap ST with GoPro
  • Multiple scans / 90  minutes
  • Rendered with 3DS Max / V-Ray
  • Visit: Crystal Palace Park Trust

After the Great Exhibition of 1851, the Crystal Palace structure was moved from Hyde Park to Penge Place in South London, now known as Crystal Palace. A railway station and an elaborate subway were also built for it.

The Palace itself burned down in 1936, and the railway station was demolished in 1961, leading to the subway’s gradual disrepair. Around 2010, the Friends of Crystal Palace, Bromley Council, and Historic England initiated a major restoration project. The subway reopened earlier this year.

The vaulted area is directly below Crystal Palace Parade and features 18 stone columns topped by terracotta-and-cream brickwork fanned vaults.

The busy road is about 1.5 meters above the vaults – buses can be seen on the road in this scan.

The same view in elevation

This section is made up of both scanner’s output – the BLK2Go for the closer / colour point clouds and the Hovermap for the longer range street captures

Scan Project: Ottoman Tombstone Replica

This is an undertaking to replicate an 18th century Ottoman gravestone which is currently held by the Royal Greenwich Heritage Trust.

Michael Talbot, Associate Professor in the History of the Ottoman Empire and Modern Middle East at the University of Greenwich, was informed by the Royal Greenwich Heritage Trust about an “Arabic tablet” which he identified as an Ottoman object and subsequently transcribed and translated the inscriptions on it.

The original tombstone itself is a late-eighteenth century artifact made of limestone or marble featuring Ottoman Turkish inscriptions in the sülüs calligraphic style. The gravestone’s origin is not clear, but it was possibly brought back from Constantinople as a memento by a British officer in the 19th century. The inscription features a poetic composition reflecting the youth and untimely death of its owner.

The tombstone itself measures 72 cm x 21.3 cm x 11 cm thick. The stone is broken at the bottom where it would have originally been set into the ground. It would also have been topped with a carved representation of the headgear associated with the deceased’s rank and profession, likely a turban, indicating a position in the religious-scholarly class.

Replicating the tombstone comprised of the following steps:

  1. Scanning: photograph all sides / angles of the object and utilising photogrammetry to generate an accurate 3d digital model of it.
  2. 3D Printing: produce actual-size moulds of the tombstone from the scan model.
  3. Casting: pour Jesmonite (similar to plaster) into the moulds and allow to set

Scanning

Photogrammetry is a process of 3d scanning whereby many photographs of an object are used to create an accurate digital model. Common points in the overlapping photos are identified in order to align them and create a point cloud – a 3D representation of the model as dots in 3d space extracted from these aligned images. This is further refined into a mesh model to form a network of triangles which are lastly “wrapped” with the texture that has been derived from the photographs to provide colour and detail to the 3D surfaces.

To get the best results for use with the photogrammetry software there should be many photos which are sharp, evenly lit – with as little shadow as possible – and capture all sides and angles. Ideally the object would be photographed in a photo-studio with controlled lights and blank backdrop etc, but since this was not possible in this case some soft lighting was brought to site to offset directional shadows from windows.

The model was photographed with a Panasonic Lumix FZ82 (on a tripod) which is a mid-range bridge camera. Manual settings / RAW format, approximately 500 photographs – then post processed in Adobe Lightroom to eliminate any blurred shots and batch edited to further reduce shadows and bump up highlights.

The photogrammetry software used for this exercise is called Reality Capture. Since the tombstone was too heavy to stand up on its end it had to be laid flat, horizontally for one set of photos and then flipped onto its front to capture the other side. Ideally Reality Capture would have automatically detected all the photos as a single object but in this case it generated two separate components: a top and a bottom. To fix this one halve had to be flipped and manually aligned in the software in order to produce a single complete model.

With the model successfully generated it can be exported to a variety of formats for a variety of purposes. For viewing / zooming / spinning the model online it has been exported to Sketchfab this model includes the texture for added realism.

For purposes of 3d printing the model is exported to a common OBJ file format. The texture wrapping step is not important to 3D printing since these printers do not reproduce the model’s colour, so the version used there is effectively monochrome.

3D Printing

Commonly 3D prints are created using PLA or photopolymer resin etc. While these materials recreate accurate models, they can feel light and “plasticky”. For the tombstone it was important to recreate as much as possible the tactility of a stone / marble material and have a weightiness that approaches something more authentic to the original in that respect.

For these reasons instead of printing the model directly, moulds of the model – effectively an inverted version of the 3d scan – were produced, into which a plaster-like material was poured and left to set.

Material used to print the moulds: TPU 95A flexible filament. This means the resulting structure is supple and bendable – strong enough to hold the pour but can be peeled away from the cast once it has set.

3D Printer used: Bambu Lab P1P. The maximum printable area of this printer is much smaller than the size of the tombstone itself meaning the mould needed to be printed as 4 sections and then reassembled for casting. Each of the sections took 18 hours to print. (shorter test section illustrated above with red mould).

Since a full dense model would use a lot of casting material – and also create a very heavy model – only an outside skin of about 10-15 cm of the model was needed to be cast. To achieve this an additional 3d printed core of the tombstone was placed inside the mould in order to cast around it. The final model is lighter and more economic with casting material and retains the proper look and feel – but with a hidden, enclosed, non-dense core.

Casting

The material used to cast the tombstone is Jesmonite – this is a water-based composite material that combines natural materials such as gypsum and resin with various other components, including water-based polymers. It is known for its flexibility, durability, and environmental friendliness compared to traditional resin-based materials. It is also less likely to chip or crack like regular plaster and can be mixed with a pigment to colour the material.

Images below show Jesmonite being mixed with pigments and some experimental, test colours.

The 4 separate 3d printed moulds were taped together to form a continuous mould to be cast into – so the moulds were printed as 4 sections with the casting as a single object which required no reassembly.

The photo above left shows the 3d printed, light core inside the mould while on the right the Jesmonite is poured in to fill the mould with the core embedded inside.

The cast itself sets fairly quickly in about 20 minutes and is then ready to be removed from the mould.  The moulds themselves can be re-used to produce more replicas (though the core would require re-printing).

The weight of the replica is initially about a third of the weight of the original, though as the moisture evaporates over a few weeks it becomes somewhat lighter, though still a substantial weight of about 15kg.