


File format required is Adobe Illustrator (any version)
You can import many common file formats into Illustrator for preparation; e.g. AutoCAD DWG, DXF, Adobe PDF
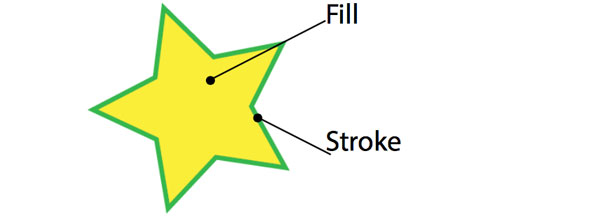
Illustrator objects are made up of FILLS – the inside of the shape – and STROKES – the outline. Correct preparation of the Illustrator is all about the stroke colour and thickness:
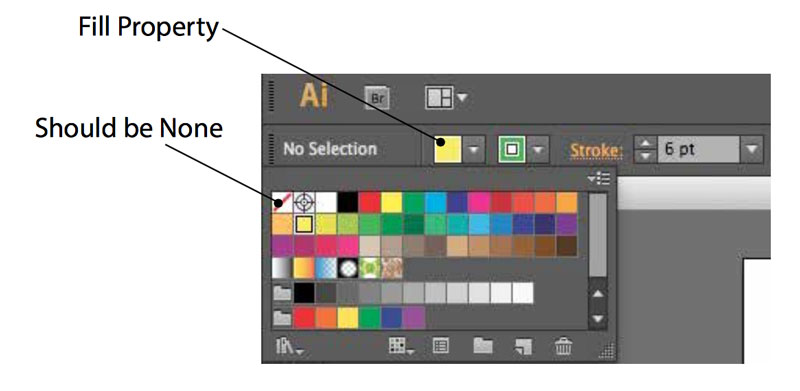
Fills are only relevant to laser cutting if you want to engrave solid areas, for straightforward line cutting and etching none of your objects should have fills; if necessary set the Fill property as “none”
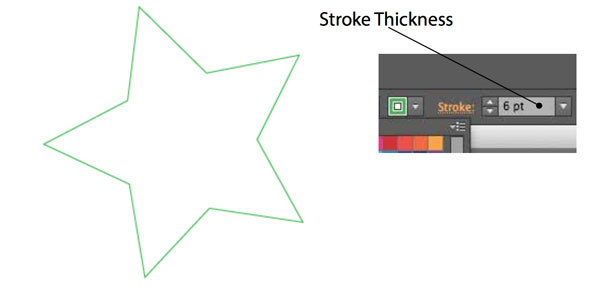
The Stroke sets the colour and thickness of the graphic and this is what directs the laser cutter to etch or cut – the stroke thickness needs to be 0.1pts
Colour of the stroke is important too – and it has to be a particular type of colour: RGB. It is best if you set you Illustrator document to RGB color space with:
File -> Document Colour Mode -> RGB
Then open up the colour window
Windows -> Colour
The look varies between different versions of Illustrator but the function is the same.
Make sure the swatch is set to RGB by clicking and selecting from the little down arrow in the top right hand corner (circled).
Now when you select a graphic in the drawing its colour value is shown – and can be changed – from this window
The colours you are most likely to be using here are Red – for cutting, and Blue – for etching. Black works too but that is for a much slower raster etch where it will draw one dot at a time.
Select your graphic and set it at RGB Blue or Red by setting the RGB values in the Colour Window at
Red
R: 255 / G: 0 / B:0
Blue
R: 0 / G:0 / B:255

This star is now proper RGB red, at 0.1 stroke thickness. If this was sent to the laser cutter it would cut out a shape of a star in the materi- al. Had it been drawn in RGB blue it would etch a drawn shape of the star into the material.
You can do a select multiple objects – or even all of them – and set their colour correctly all in one go. Keep an eye on the Fill property while you do this and make sure it really is None and not just white.
The example above is a very simple one; but problems are likely to arise with more complex shapes and drawings that come in from oth- er sources. Typical issues are:
Multiple Lines
This is when there are two or more lines on top of each other. It often occurs when drawings are brought in from a big AutoCAD file. What it would mean is the laser going over those lines again and again cre- ating inconsistent width lines (and taking longer to complete).
If it is just two lines on top of each other you could probably get away with printing it anyway, if there are more then you really should de- lete the duplicates. Unfortunately this can be a tedious job; a couple of things that might help you are
- The AutoCAD 2013 has a tool called “Overkill” that will detect and delete duplicate objects in a selection set. Just type “overkill” then follow the prompts.
- In Illustrator you could window select an instance of multiple lines, then shift select, to deselect the top one, then hit delete to delete all but that one.
Nested Groups
An Illustrator file that appears to be non-filled lines may still have fills and wrong line-weights hidden inside groups. This is quite common in stock illustrations grabbed off the internet. You may have to ex- plode groups to investigate this.
Errors like this will show up when you bring your file into the laser control software –