You can now speed up your 3DS Mental Ray renders in the Digital Studio by using distributing bucket rendering – this divides your rendered image up into squares and sends each of these squares out for rendering by other machines in the network. After each square is processed it is returned to your machine and reassembled into a single image. For small simple renders it doesn’t make a huge difference but for larger renders it can bring render time down by up to 75%.
Note: This process differs from the previously posted guide to using backburner to speed up animations – where each frame of a multi-frame animation is sent to render slaves.
How to Distribute Bucket Render in the Digital Studio
Note: this process only works for Mental Ray renders – not Vray or 3DS Scanline (Mental Ray is the default though).
All you need to do to distribute your render is to point your machine at the render slaves. Open up the 3D Studio render dialogue box and choose the Processing tab. First, below “Translator Options”, ensure “Use Placeholder Objects” is ticked.
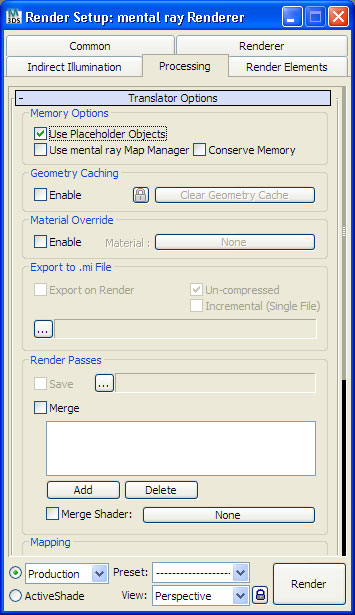
Then, at the bottom of this dialogue window under “Distributed Bucket Render” make sure Distributed Render and Distributed Maps is clicked on.
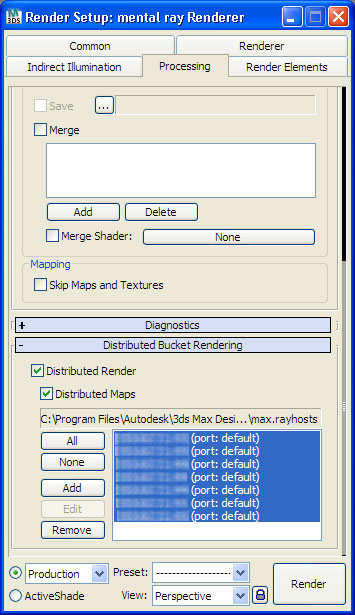
This specifies the 7 machines that are sitting waiting for render jobs – the Mental Ray distributed bucket rendering system allows up to 8 processor cores to be used; these machines are Intel i7 quad core machines – there’s 4 cores on the processor – so you can select two of them. You can specify all of them but anything over the 8 core limit will be ignored (and actually slows down the initial render setup so it’s good to unhighlight them). The 8 core limit doesn’t include the cores in the machine you are rendering from.
Hit render to send your job out; there’s a little time overhead due to the process of dividing up and sending out.
A message window may pop up alerting you to any problems:
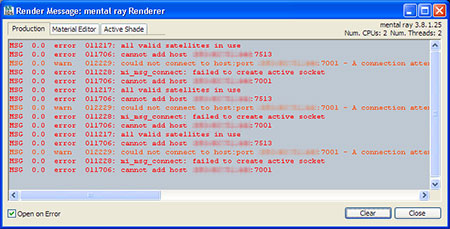
in this case it is complaining that it can’t reach a few of the machines specified (they are actually not switched on – in which case it skips them) and that it has got to it’s limit of 8 cores that it can render to (in which case it just ignores the rest). It’s worth noting down the unsuccessful connections and unhighlighting them in the machine list as the setup will be done quicker. These errors don’t stop the render from going ahead though.
How to Distribute Bucket Render in your Home Network
It is quite simple to setup a bucket render farm on your own network, provided that
- You have a properly functioning IP network
- You can configure the machines used with a STATIC IP address (it is possible with a dynamic IP address but it’s not so convenient as you would have to keep re-entering that address on the render master)
- You have each machine installed with 3d studio.
On each machine you want to act as a slave you need to issue two command lines. Select Start – Run and type “cmd”. This will open up the black background command window.
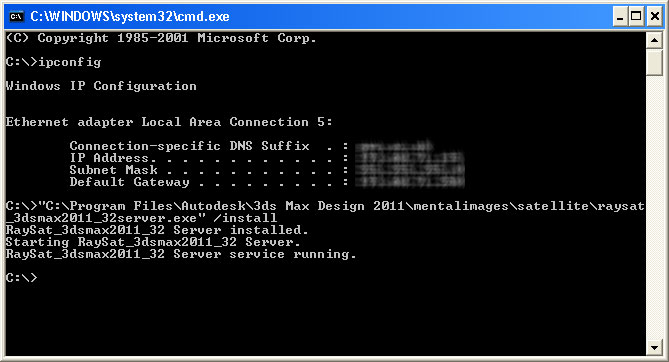
then type in the command “ipconfig” and hit return. This will show you the current IP address of the machine you area on – you need to make a note of this address so you can point your renderer at it later on. It’s likely to be something like 172.16.8.10.
Next type in this rather long command (including the quotation marks):
“C:\Program Files\Autodesk\3ds Max Design 2011\mentalimages\satellite\raysat_3dsmax2011_32server.exe” /install
Note: this command is for a Windows XP installation of the 32 bit version of 3D Studio Max Design 2011. If you’re running a different version of 3ds on a different platform then the path – the location of where the files are – is likely to be different.
What you should see as a reply is “RaySay_3dsmax2011_32 server installed”. If it does say that then that’s all you need to do – the software will just sit there waiting for render requests. If it returns an error then you need to check your path / spelling / 3ds version, etc.
Note: the machine will now always be listening for render requests – even when the machine is logged out. When it’s logged in and working, it will also still process renders (so you may want to warn whoever is working on that machine that they are likely to notice some slowdowns).
Once you have added your rendering machines then you can run 3DS on your master machine and point it to your farm. In the 3ds render setup box go to the Distributed Bucket Render section, select Add and type in each IP address of all your machines.
That’s it, hit render and the render slaves will kick into life. You can use the message window to troubleshoot problems.
To remove the render service and stop each machine from acting as a slave you need to go back to the command window and issue the following command
“C:\Program Files\Autodesk\3ds Max Design 2011\mentalimages\satellite\raysat_3dsmax2011_32server.exe” /remove